How to Build a Cheap Home Theater Room That Looks Expensive?
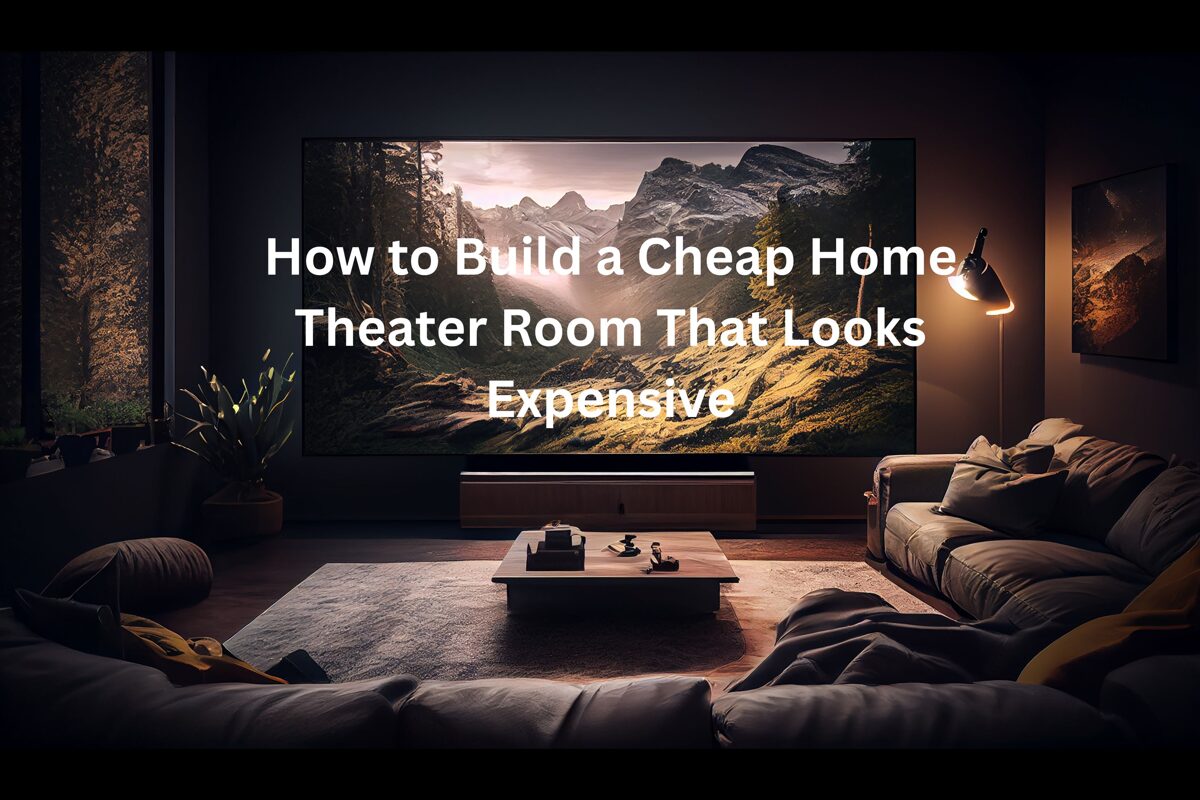
Discover Simple Upgrades, Lighting Tricks, and Layout Ideas That Instantly Make a Budget Room Look Expensive
Discover simple upgrades, lighting tricks, and layout ideas that instantly make a budget room look expensive. This foundational principle transforms ordinary budget home theater ideas into extraordinary spaces that rival professional installations. The difference between cheap-looking and expensive-appearing theaters often comes down to subtle details rather than major expenditures.Professional home theater room design relies on three core pillars: strategic lighting creating atmosphere, thoughtful layout maximizing impact, and careful attention to finishing details. Each element contributes to perceived luxury without necessarily increasing home movie theater cost significantly. A $500 investment in the right areas often delivers more visual impact than $5,000 spent carelessly.
The Psychology of Luxury Perception
What makes spaces appear expensive? Professional designers identify key factors:Visual Cleanliness: Hidden home theater wiring & cabling and organized equipment create professional impressions. Exposed cables and cluttered setups immediately signal budget constraints regardless of equipment quality.
Intentional Lighting: Layered home theater lighting with dimmers, accent lights, and bias lighting creates sophisticated ambiance that low-cost overhead fixtures never achieve. This simple upgrade transforms room perception dramatically.
Cohesive Design: Mismatched furniture and random equipment placement look amateur. Unified color schemes and deliberate home theater layout planning create intentional, expensive appearances.
Quality Finishes: Sharp paint lines, proper acoustic panel installation, and attention to trim details separate professional-looking results from obvious DIY projects.
Mastering these principles allows budget-friendly upgrades delivering luxury impressions while keeping home theater installation cost manageable.
Strategic Budget Allocation: Where to Invest vs. Save
Understanding Cost-Value Relationships
Not all home theater equipment dollars deliver equal visual impact. Strategic allocation maximizes perceived value.High-Impact Investments (Visible Quality):
- Home theater seating ($800-$2,000): Most visible element, justifies premium
- Home theater lighting ($300-$800): Creates atmosphere, immediate visual impact
- Acoustic treatment panels ($400-$800): Professional appearance, performance benefits
- Quality paint and finishes ($200-$400): Foundation of expensive look
- AV receiver ($300-$600): Performance matters, appearance doesn't
- Home theater speakers (budget options work well with proper placement)
- Subwoofer placement (single quality unit beats multiple cheap ones)
- Home theater wiring & cabling (functional quality over boutique brands)
The 60-30-10 Budget Rule
Professional designers apply proportional budget allocation:60% Equipment Performance: Affordable home theater setup components delivering quality experiences- Home theater projector or TV: $1,200-$2,500
- Surround sound systems: $600-$1,500
- AV receiver: $400-$700
- Home theater seating: $800-$1,500
- Home theater lighting: $400-$600
- Acoustic treatment and design: $300-$600
- Cable management: $100-$200
- Trim and paint: $200-$300
- Decorative elements: $100-$200
Lighting Magic: Creating Million-Dollar Ambiance on a Budget
Understanding Professional Theater Lighting
Home theater lighting transforms spaces more dramatically than any single upgrade. Professional cinemas invest heavily in lighting design; you can achieve similar results affordably.Layered Lighting Strategy
Primary Lighting Layers:Ambient Lighting ($150-$400): Smart bulbs in existing fixtures provide adjustable background illumination. Philips Hue, LIFX, or Wyze bulbs ($10-$50 each) enable scene creation and automation without expensive smart home integration systems.
Cost-saving tip: Replace 4-6 existing bulbs with smart alternatives rather than installing new fixtures, reducing home theater installation cost while maintaining flexibility.
Accent Lighting ($100-$300): LED strips create dramatic effects at minimal cost:
- Behind screen/TV bias lighting: $20-$50 (reduces eye strain, adds premium feel)
- Cove lighting along ceiling: $40-$100 (creates floating ceiling illusion)
- Floor lighting: $30-$80 (safe pathway lighting, atmospheric)
- Equipment accent lights: $20-$40 (highlights premium components)
Lighting Control and Automation
Budget-Friendly Automation ($150-$400): Instead of expensive $3,000-$8,000 professional control systems, leverage low-cost home theater solutions:Smart Switches and Plugs ($80-$200): Replace existing switches with smart alternatives (Lutron Caseta, TP-Link Kasa) providing dimming and scene control through smartphone apps or voice assistants.
Universal Remote Integration ($50-$150): Logitech Harmony or Sofabaton remotes include lighting control alongside AV equipment, creating unified experiences through av system integration software without professional programming costs.
Voice Control (Free with existing devices): Amazon Alexa or Google Assistant smart speakers enable voice commands like "movie mode" triggering preset lighting scenes, mimicking expensive smart home integration at zero additional cost.
Color Temperature Psychology
Professional home theater room design uses color temperature strategically:Warm White (2700-3000K): Pre-show ambiance, inviting atmosphere Neutral White (3500-4000K): Cleaning and setup lighting RGB Color Options: Dynamic scenes, party modes, thematic lighting
Budget smart bulbs provide these options, while fixed-temperature bulbs limit flexibility. The $20-$30 premium per smart bulb pays dividends in versatility and perceived luxury.
Acoustic Treatment That Looks Designer, Not DIY
The Visual Impact of Acoustics
Acoustic treatment serves dual purposes improving sound quality and creating professional aesthetics. Commercial panels cost $50-$150 each; DIY alternatives deliver identical performance and better customization for $8-$15 per panel.Creating Custom Acoustic Panels
Professional-Looking DIY Panels ($200-$500 for complete room):Materials per Panel ($8-$12):- 2" mineral wool insulation: $6-$8
- 1x3" wooden frame: $2-$3
- Acoustically transparent fabric: $1-$2 (bulk purchasing)
- Mounting hardware: $0.50-$1
Color Coordination: Match fabric to room color scheme rather than random selection. Coordinated colors appear intentional and expensive; mismatched panels look budget DIY.
Geometric Arrangements: Strategic panel placement in patterns creates visual interest:
- Symmetrical arrangements (professional, ordered)
- Alternating sizes creating rhythm
- Consistent spacing (measure precisely)
- Strategic color blocking
Strategic Panel Placement
High-Impact Positions:- First reflection points (sides, ceiling): Most visible, most effective
- Behind screen/TV: Large visual statement
- Side walls: Frame room professionally
- Rear wall diffusion: Adds sophistication
Alternative Acoustic Solutions
Bass Trapping ($150-$400): Corner bass traps control problematic low frequencies while appearing built-in. DIY construction using similar materials creates custom-look solutions versus commercial alternatives.Fabric Wall Panels ($300-$800 DIY vs. $2,000-$5,000 professional): Stretch fabric over wooden frames covering entire walls creates luxury studio appearance. This budget-friendly upgrade delivers maximum visual impact per dollar while improving home theater acoustics significantly.
Screen and Display: Creating Cinema-Quality Presentation
Screen Selection Strategy
Home theater screen and display choices dramatically affect room aesthetics and home movie theater cost.Projector Setup Optimization
Budget Projector Screens ($100-$400):DIY Painted Screen ($50-$150): Special projector paint on smooth walls creates permanent screens at minimal cost. Proper surface preparation and quality paint deliver results rivaling $300-$500 commercial screens.Fixed Frame Screens ($150-$400): Entry-level tensioned screens provide professional appearance exceeding pull-down alternatives. The clean, permanent installation appears intentional and expensive versus temporary-looking retractable screens.
Screen Frame Treatment: Black velvet trim around screens ($20-$40 material) creates custom theater appearance rivaling $1,000+ professional installations. This simple DIY home theater upgrade transforms screen perception dramatically.
TV Installation Excellence
Wall Mounting Strategy:Professional Mounting Appearance:
- Perfect leveling (absolutely critical)
- Centered placement with equal side margins
- Hidden cables (in-wall or concealed raceways)
- Proper height (eye level when seated)
Cable Management Solutions ($40-$150):
- In-wall cable kits: $40-$80 (professional appearance)
- Cable raceways: $15-$40 (organized visibility)
- Cable sleeves: $10-$20 (bundled neatness)
Seating Solutions: Luxury Comfort on Budget
Home Theater Seating Strategies
Home theater seating represents the most visible investment guests notice comfort and appearance immediately.Budget Seating Options Looking Expensive
Consumer Recliners ($300-$700 per seat): Quality furniture store recliners often exceed budget home theater seating in comfort while costing less. Strategic selection matching room aesthetic creates cohesive, intentional appearance.Selection Criteria:
- Consistent color and style (mixing appears cheap)
- Quality upholstery (faux leather, quality fabric)
- Appropriate scale (proportional to room)
- Cup holders (functionality matching theaters)
Used Theater Seats ($200-$500 per seat): Commercial theater renovations sometimes sell authentic cinema seats at discount prices. Restoration and reupholstery create unique, impressive installations at affordable home theater setup costs.
Seating Arrangement and Risers
DIY Platform Risers ($200-$600): Elevated rear seating creates authentic theater experience:- 8-12" height difference optimal
- Carpeted platforms (professional finish)
- Integrated storage (hidden functionality)
- LED step lighting (safety and ambiance)
Color Scheme and Paint: The Foundation of Luxury
Professional Color Selection
Home theater room design professionals understand color psychology and visual impact.Optimal Color Strategies
Dark Wall Colors ($150-$300): Dark gray, charcoal, or navy blue walls create:- Reduced light reflection (better picture quality)
- Intimate, theater-like atmosphere
- Sophisticated, intentional appearance
- Background for highlighting other elements
Ceiling Treatment ($100-$250): Matte black or very dark gray ceilings disappear visually, creating floating screen effect and eliminating distracting reflections. This simple paint choice costs minimal home theater installation cost while delivering maximum impact.
Accent Wall Strategy ($50-$100): Single accent wall behind seating or screen creates focal point and depth:
- Darker than surrounding walls
- Complementary color to room scheme
- Professional paint execution (sharp lines)
Paint Quality and Application
Professional Results on Budget:- Premium paint ($40-$50/gallon) covers better, saving money
- Proper surface preparation (critical for luxury appearance)
- Sharp trim lines (painter's tape, steady hand)
- Matte or eggshell finish (hides imperfections, reduces reflection)
Flooring and Finishing Touches
Flooring Impact on Perception
Cost-Efficient Home Theater Design flooring balances acoustics, aesthetics, and budget.Budget Flooring Solutions
Carpet Tiles ($200-$600): Modular carpet tiles provide:- Easy installation (DIY-friendly)
- Pattern flexibility (custom designs)
- Damage replacement (individual tiles)
- Acoustic benefits (sound absorption)
- Professional appearance
Area Rugs ($150-$500): For existing hard floors in living room home theater applications, quality area rugs provide:
- Acoustic improvement
- Visual warmth
- Easy updates
- Budget flexibility
Baseboard and Trim Details
Professional Finishing ($100-$300):- Fresh trim paint (crisp, clean appearance)
- Baseboard consistency (same throughout)
- Corner precision (careful cutting)
- Caulking gaps (polished look)
Equipment Selection: Value Over Brand Names
Smart Equipment Choices
Entry-level home theater gear has never been better. Strategic selection delivers 90% of premium performance at 40% of cost.Display Technology Decisions
Projector vs TV for home theater:Budget Projectors ($500-$1,200): Epson, BenQ, and Optoma offer excellent 1080p and 4K UHD options rivaling expensive alternatives. For screen sizes exceeding 100", projectors deliver unmatched value
.Large Format TVs ($800-$2,000): 75-85" displays from TCL, Vizio, or Hisense provide stunning HDR10 and Dolby Vision performance at accessible prices. For small room home theater or bright spaces, TVs often prove optimal.
Audio Equipment Value
Soundbar vs receiver + speakers:Quality Soundbars ($300-$800): Modern soundbars from Vizio, Samsung, or Sonos provide impressive surround sound systems in simplified packages. For apartment-friendly home theater or budget-constrained projects, soundbars deliver excellent value.
Budget Speaker Packages ($400-$1,000): Bookshelf speakers from Polk Audio, Klipsch, or Pioneer create authentic 5.1 or 7.1 experiences. Paired with value-for-money audio equipment receivers (Denon, Yamaha), these systems outperform premium soundbars while appearing more substantial.
Subwoofer Placement Strategy: Single quality subwoofer ($200-$500) beats multiple cheap alternatives. Proper placement maximizes performance while minimizing home movie theater cost.
Receiver Selection
Best affordable AV receivers ($300-$600): Previous generation models from Denon, Yamaha, or Onkyo provide Dolby Atmos, HDMI ARC / eARC, and 4K UHD support at significant discounts. Last year's technology performs identically for most users.Technology Integration Without High Costs
Affordable Smart Home Integration
Professional home theater installation cost often includes expensive control systems ($3,000-$10,000). Budget alternatives achieve similar functionality.DIY Automation Solutions
Av System Integration Software Alternatives:Free/Low-Cost Options:
- Home Assistant (free, powerful)
- Hubitat ($150, local control)
- Manufacturer apps (Sony, LG, Samsung)
- Universal remote apps (smartphone control)
- Smart plugs for equipment power management
- Smart switches for lighting control
- Universal remote (Logitech Harmony alternative)
- Voice assistant integration
Streaming and Media Management
Budget Media Server ($100-$300):- Nvidia Shield TV ($150-$200)
- Apple TV 4K ($130-$180)
- Roku Ultra ($80-$100)
Layout and Space Planning
Home Theater Layout Planning Excellence
Proper home theater layout planning maximizes space efficiency and visual impact regardless of budget.Room Configuration Strategies
Optimal Seating Distance:- 1080p: Screen width × 1.5-2.5
- 4K UHD: Screen width × 1-1.5
Speaker Placement Precision:5.1 Surround Sound Setup:
- Front L/R: 22-30° from center viewing position
- Center: Directly at screen
- Surrounds: 90-110° from listening position
- Subwoofer placement: Corner or along front wall
Dolby Atmos Setups: Height channels directly overhead or slightly forward
Proper placement extracts maximum performance from budget-friendly upgrades, making affordable equipment sound expensive.
Small Room Home Theater Optimization
Apartment-Friendly Home Theater Strategies:Space Maximization:
- Wall-mounted displays saving floor space
- In-wall speakers (when permitted) eliminating stands
- Furniture serving multiple purposes
- Strategic acoustic treatment maintaining openness
- Furniture arrangement emphasizing viewing
- Hidden equipment (cabinets, console integration)
- Flexible lighting (multiple scenes)
- Minimal dedicated theater elements
Soundproofing on a Budget
Affordable Soundproofing Strategies
Complete soundproofing costs $3,000-$8,000 professionally. Budget alternatives reduce noise significantly without major expense.Strategic Sound Control
Door Sealing ($30-$80):- Weather stripping: $15-$30
- Door sweeps: $15-$25
- Solid core door (if replacing): $100-$200
Window Treatments ($100-$400):
- Heavy blackout curtains: $50-$150/window
- Cellular shades: $80-$200/window
- Window plugs (DIY): $20-$50/window
Strategic Mass Addition ($200-$600):
- Additional drywall layer: $150-$400
- Mass-loaded vinyl (key areas): $100-$300
- Bookshelf sound dampening: Free using existing items
User Queries: Common Budget Theater Questions
1. Can I really build an expensive-looking home theater for under $5,000?
Absolutely. Strategic home movie theater cost allocation achieving luxury appearance within $4,000-$5,000 budgets:Sample $4,800 Budget Breakdown:
- 75" TV or budget 4K home theater projector + screen: $1,500
- Budget home theater 5.1 speaker system: $700
- Value-for-money audio equipment receiver: $400
- 2 quality recliners: $900
- DIY acoustic treatment (12 panels): $300
- LED strips and smart lighting: $200
- Paint and finishing: $250
- Cable management: $150
- Decorative elements: $200
- Miscellaneous supplies: $200
- Perfect execution (clean paint, organized cables, precise mounting)
- Cohesive design (unified colors, consistent style)
- Strategic lighting (creating atmosphere and hiding budget elements)
2. What are the most impactful budget upgrades for making a theater look expensive?
The three highest-impact DIY home theater upgrades delivering maximum perceived value:#1: Professional Lighting ($200-$400): Layered home theater lighting with LED strips, smart bulbs, and dimmers transforms ambiance instantly. This upgrade creates the single most dramatic difference between amateur and professional appearances.Implementation:
- Bias lighting behind screen: $30-$50
- Smart bulbs in existing fixtures: $60-$120
- Accent LED strips: $40-$100
- Dimmer switches or smart switches: $60-$120
Selection Strategy:
- Two quality recliners beats four cheap seats
- Consistent style and color
- Proper scale for room size
- Features matching budget (cup holders, USB ports)
Implementation:
- 12-16 custom fabric panels
- Geometric arrangement pattern
- Complementary room colors
- Professional mounting (precise alignment)
3. How can I hide cables and equipment to create a cleaner, more expensive look?
Cable management separates amateur from professional home theater room design. Multiple solutions exist at various budget levels:In-Wall Cable Management ($40-$120 per run):
- Paintable cable raceways: $15-$40
- In-wall rated cable kits: $40-$80
- Professional look without electrician costs
- Code-compliant solutions available
.Furniture Integration ($50-$200):
- AV furniture with cable management
- Mounted cable trays behind equipment
- Cable sleeves bundling multiple cords
- Strategic furniture placement hiding connections
- Closed AV cabinets with ventilation
- In-wall equipment niches
- Rear-of-seating equipment racks (in larger rooms)
- Under-stair storage (in basement theaters)
4. What's the difference between media room and dedicated theater room in terms of budget and appearance?
Media room vs home theater considerations affect both home movie theater cost and design approach:Multi-Purpose Media Room: Budget Range: $3,000-$8,000 Characteristics:
- Ambient light accommodation
- Multi-functional furniture
- Flexible usage patterns
- Limited acoustic treatment
- Integrated with home decor
- TV typically optimal display choice
- Lower home theater installation cost
- Family-friendly flexibility
- Easier spouse approval
- Simpler maintenance
- Better resale appeal
- Complete light control
- Specialized theater seating
- Extensive acoustic treatment
- Immersive audio systems
- Single-purpose space
- Often features projector
- Superior performance potential
- More authentic theater experience
- Impressive showcase space
- Optimized acoustics
5. How important is acoustic treatment for a budget home theater, and how can I do it cheaply?
Acoustic treatment ranks among the most cost-effective improvements for home theater acoustics, often delivering greater performance enhancement than expensive equipment upgrades.Impact Assessment:
- Properly treated room with $1,000 speakers > Untreated room with $5,000 speakers
- Acoustic improvements affect all content (movies, music, gaming)
- Visual benefits create professional appearance
- DIY execution keeps costs minimal
- Mineral wool insulation: $80-$150 (24-30 panels)
- Wood framing materials: $40-$80
- Acoustic fabric: $60-$120 (bulk purchase)
- Mounting hardware: $20-$40
- Build wooden frames (1x3" or 1x4" lumber)
- Fill with 2" mineral wool
- Wrap with acoustically transparent fabric
- Secure fabric with staples
- Mount using French cleats or Z-clips
- First reflection points (sides, 6-8 panels)
- Front wall behind screen (3-4 panels)
- Rear wall (4-6 panels for absorption or diffusion)
- Ceiling reflection points (4-8 panels if accessible)
- DIY panels: $8-$15 each
- Commercial panels: $50-$150 each
- Professional installation: $2,000-$5,000 complete room
6. What lighting tricks make the biggest difference in creating expensive ambiance?
Home theater lighting provides the highest return on investment for creating luxury atmosphere:Essential Lighting Techniques:#1: Bias Lighting ($20-$50): LED strips behind TV or screen reduce eye strain while creating premium floating display effect. This $30 upgrade delivers immediate sophisticated appearance.
Installation:
- USB-powered LED strip
- Mounted to display back
- Warm white or neutral white color temperature
- Provides subtle glow without distracting from content
Pre-Show Scene: Ambient lighting at 50-70% brightness Movie Mode: Minimal accent lighting, pathway lights only Intermission: Moderate ambient lighting for movement Cleaning Mode: Full brightness for maintenance
Smart bulbs and switches enable scene programming through av system integration software or voice commands, mimicking expensive automation at budget prices.#3: Accent Lighting ($100-$300): Strategic accent placement creates depth and visual interest:
- Cove lighting (ceiling perimeter): Creates floating ceiling illusion
- Floor lighting (along walls): Safe pathway, atmospheric glow
- Equipment backlighting: Highlights premium components
- Architectural highlighting: Emphasizes design features
Professional Tips:
- Never use exposed bulbs (always shielded or indirect)
- Dimmers on all lighting circuits
- Separate control zones (minimum 3 zones)
- Avoid pure white slight warmth always more luxurious
7. How can I make a small room home theater look bigger and more luxurious?
Small room home theater challenges require strategic design maximizing perceived space:Visual Expansion Techniques:
Dark Wall Colors ($150-$250): Counter-intuitively, dark colors make small home theater room design spaces feel larger by:
- Eliminating visible boundaries
- Creating infinity effect
- Focusing attention on screen
- Appearing more sophisticated
Minimal Furniture ($800-$1,500): Two quality recliners create more spacious feeling than cramped four-seat configuration. Prioritize comfort over quantity in small spaces.
Wall-Mounted Everything:
- Wall-mounted TV or screen (saves floor space)
- In-wall speakers where possible (eliminates stands)
- Floating shelves (lighter than furniture)
- Wall-mounted lighting (removes floor lamps)
Organized Cable Management: Clutter emphasizes small size. Clean, organized installations appear more spacious regardless of actual dimensions.
Strategic Acoustic Treatment:
- Thinner panels (1.5" vs. 2-4") in small spaces
- Corner bass traps (don't shrink room visually)
- Ceiling treatment (draws eyes upward)
8. What's the best way to achieve cinema-quality sound on a tight budget?
Affordable home theater setup audio requires strategic investment in proper components and configuration:Budget Audio Strategy ($800-$1,500 total):Speaker Package Selection ($400-$700): Bookshelf speakers outperform tower speakers at budget price points. Quality compact options from:
- Polk Audio (S15/S20): $200-$350/pair
- Klipsch (Reference series): $250-$400/pair
- Pioneer (Andrew Jones series): $150-$250/pair
- SVS SB-1000: $500
- Polk Audio HTS 10/12: $200-$300
- BIC America F12: $200
Receiver Selection ($300-$600): Value-for-money audio equipment from Denon (S-Series), Yamaha (RX-V series), or Onkyo provides Dolby Atmos support, room correction, and adequate power.
Critical Success Factors:
Proper Speaker Placement (Free): Correct positioning extracts maximum performance:
- Front L/R: Ear level, angled toward listening position
- Center: Below/above screen at ear level
- Surrounds: Slightly above ear level, 90-110° from center
- Subwoofer placement: Corner or along front wall
Acoustic Treatment ($200-$400): DIY acoustic treatment delivers greater performance improvement than upgrading from $700 to $1,500 speakers. Prioritize room treatment over component upgrades initially.
Alternative Approach - Soundbar Plus ($400-$1,000): For living room home theater or simplified setups, quality soundbars with wireless subwoofers provide impressive surround sound systems:
- Vizio Elevate: $600-$800
- Samsung Q-Series: $500-$900
- Sonos Arc + Sub: $1,400 (premium budget)
Real-World Case Studies
Case Study 1: The $4,200 Spare Bedroom Transformation
Project Profile: Marcus transformed his 12' x 15' spare bedroom into an impressive dedicated theater room on a strict budget.Budget Allocation: Equipment ($2,200):
- BenQ TH585 1080p projector: $600
- 100" manual pull-down screen: $120
- Polk Audio 5.1 speaker package (refurbished): $500
- Yamaha RX-V385 receiver: $280
- Amazon Fire TV Stick 4K: $50
- Cables and accessories: $150
- Universal remote: $80
- Streaming service player mount: $20
- 2 leather recliners (Ashley Furniture sale): $700
- DIY acoustic panels (14 panels, custom fabric): $280
- Smart lighting (6 bulbs, 2 LED strips): $180
- Blackout curtains: $120
- Area rug: $80
- Throw pillows and blankets: $40
- Dark gray paint (walls and ceiling): $180
- Baseboard paint and trim: $60
- DIY platform riser: $180
- Cable management: $80
- Miscellaneous hardware: $100
High-Impact Choices:
- Professional-quality paint job (sharp lines, consistent finish)
- Custom acoustic panels matching wall color
- Layered lighting creating atmosphere
- Quality seating prioritized over equipment upgrades
- Immaculate cable management
- 1080p projector versus 4K (guests don't notice at 100" from 12-14')
- Refurbished speakers (factory warranties, perfect condition)
- Manual versus motorized screen ($120 vs. $500-$1,000)
- DIY platform riser ($180 vs. $800-$1,500 professional)
Case Study 2: The $3,800 Living Room Transformation
Project Profile: Sarah and Tom converted their living room home theater into a sophisticated entertainment space working within existing furniture and layout.Budget Breakdown: Display and Audio ($2,100):
- 75" TCL 6-Series TV (open box): $900
- Vizio M-Series Elevate soundbar: $600
- Wall mount and accessories: $100
- Streaming devices (already owned): $0
- HDMI cables and organization: $80
- Smart power strip: $40
- Replacement TV stand: $180
- Small equipment cabinet: $200
- 8 Philips Hue color bulbs: $320
- Hue bridge and dimmer switches: $120
- LED strip lighting (3 zones): $90
- Smart plugs (5): $60
- Floor lamp upgrade: $120
- Table lamp upgrade: $80
- New lampshades: $60
- Remote-controlled curtains motor: $50
- 6 small DIY acoustic panels: $120
- Decorative fabric wall panels: $180
- New throw pillows (8): $160
- Heavy blackout curtains: $180
- Area rug: $120
- Ottoman/coffee table: $40
Clever Solutions:
- Smart lighting creating instant room transformation
- Soundbar avoiding surround speaker spouse compromise
- Acoustic panels doubling as wall art (fabric-wrapped decorative designs)
- Existing sectional sofa supplemented with premium throw pillows
- Multi-zone LED lighting highlighting architectural features
- Windows requiring light control without permanent blackout
- Ambient light affecting TV viewing (solved with bias lighting and strategic curtains)
- Equipment storage maintaining living room aesthetics
- Family-friendly design balancing theater performance with daily use
Sarah's Key Insight: "Don't fight your space work with it. We wanted both family room and theater, so we focused on flexible solutions. Smart lighting was our best investment it literally changes the room's personality instantly. Also, acoustic treatment doesn't have to look like foam on walls. Our fabric panels look like expensive wall art while improving sound."
Case Study 3: The $5,400 Basement Theater Paradise
Project Profile: The Johnson family converted their unfinished 16' x 20' basement into a dedicated theater room through phased DIY execution.Comprehensive Budget: Construction and Finishing ($1,800):
- Drywall materials and installation: $600
- Framing materials: $300
- Electrical additions (3 circuits): $400
- Paint (dark colors): $200
- Baseboard and trim: $180
- Carpet tiles (commercial grade): $450
- Ceiling tiles: $270
- Epson Home Cinema 2150 projector: $800
- 120" fixed frame screen: $280
- Denon AVR-S750H receiver: $400
- Polk Audio 7.1 speaker system: $750
- SVS SB-1000 subwoofer: $500
- Media streaming device: $130
- Universal remote: $90
- Cables and accessories: $150
- 4 used commercial theater seats (restored): $600
- DIY platform riser (2 rows): $280
- 18 custom acoustic panels: $380
- LED lighting system: $240
- Blackout window covers: $60
- Decorative elements: $140
Standout Features:
- Authentic theater seats creating immediate "wow factor"
- Two-tier platform with integrated step lighting
- Extensive acoustic treatment delivering reference-quality sound
- Dark, enveloping environment maximizing immersion
- Family collaboration creating shared achievement
- DIY drywall and framing ($2,500-$4,000 saved versus contractors)
- Used theater seats ($1,200 saved versus new theater recliners)
- DIY acoustic panels ($2,000+ saved versus commercial panels)
- DIY platform construction ($1,200 saved versus professional risers)
- Family labor (~120 hours × $50/hour = $6,000 saved)
Challenges Overcome:
- Learning electrical work (YouTube tutorials, electrical forum guidance)
- Platform construction precision (ensuring level, sturdy construction)
- Acoustic panel fabrication (initial attempts wasted materials learning curve)
- Coordinating family schedules for work sessions
- Managing project duration while maintaining enthusiasm
Biggest Lesson: "We underestimated time requirements initially everything takes longer than YouTube makes it seem. But we also didn't anticipate how satisfying the process would be. Working together as a family and seeing our vision come to life was incredibly rewarding. Now when we watch movies, there's extra pride knowing we built this ourselves."
Conclusion
Building a cheap home theater room that looks expensive isn't about deception it's about intelligent resource allocation, attention to detail, and understanding what creates perceived value. While home movie theater cost and home theater installation cost can reach astronomical levels, strategic planning enables impressive results at accessible budgets.The key principles we've explored demonstrate that luxury appearance stems from:
Strategic Investment: Prioritizing visible elements like home theater seating, home theater lighting, and acoustic treatment over hidden components delivers maximum perceived value. A $2,000 equipment investment in a beautifully finished room impresses more than $8,000 in equipment surrounded by bare walls and poor lighting.
Execution Excellence: Professional-quality finishing separates expensive-looking from actually expensive. Clean paint lines, organized cables, precise mounting, and attention to trim details cost time rather than money while transforming overall perception.
Design Cohesion: Unified color schemes, consistent styles, and intentional choices create sophistication regardless of component costs. Mismatched elements appear budget-constrained even when individually expensive.
Lighting Mastery: Home theater lighting provides the highest return on investment for creating atmosphere. Layered lighting with smart controls, bias lighting, and accent illumination creates million-dollar ambiance for hundreds of dollars.
Acoustic Intelligence: DIY acoustic treatment delivers designer aesthetics while improving performance. Custom panels in coordinated colors cost $8-$15 each versus $50-$150 commercial options while providing superior customization.
Whether you're creating a dedicated theater room, transforming a living room home theater, or optimizing a small room home theater, these principles apply universally. The case studies demonstrate that budget home theater ideas executed thoughtfully deliver results rivaling professional installations costing 3-5 times more.
Remember that home theater room design success isn't measured solely by equipment specifications or total expenditure it's measured by enjoyment, memories created, and pride in your space. A $4,000 theater built with care, attention to detail, and smart choices provides more satisfaction than a hastily assembled $15,000 setup.
Start with clear vision, prioritize what matters, execute professionally, and don't rush the process. Your dream affordable home theater setup awaits, ready to impress guests and deliver countless hours of entertainment. The difference between cheap-looking and expensive-appearing theaters lies in your hands choose wisely, work carefully, and enjoy the transformation journey.
The expensive look isn't about expensive components it's about expensive thinking applied to budget resources. Master this mindset, and your home theater installation cost investment will deliver luxury experiences that far exceed their price tags.