Ideal Room Sizes for Standard Throw Projectors
Choosing the right projector and screen for your room size is essential for achieving the best possible image quality and immersive viewing experience. A standard throw projector, which is the most common type, requires a certain amount of distance from the screen to project a large enough image. If the room is too small, the projected image may be too small or the projector may need to be placed too close to the screen, resulting in a distorted or blurry picture.
On the other hand, if the room is too large, you may need a more powerful projector or a larger screen to fill the space adequately. This is where understanding the concept of projector throw distance becomes crucial. By calculating the ideal throw distance based on your room size and desired screen size, you can ensure that your projector and screen are perfectly matched to deliver stunning visuals
.In this comprehensive blog post, we will dive deep into the world of projector throw distances and room sizes. We'll explore the factors that influence throw distance, provide guidelines for determining the ideal room size for your projector, and share tips on optimizing your setup for the best possible viewing experience. Whether you're a home theater enthusiast, a business professional, or an AV system integrator, understanding the relationship between room size and projector throw distance is key to creating a top-notch projection setup
Understanding Projector Throw Ratios
Before we delve into ideal room sizes, let's first understand the concept of projector throw ratios. The throw ratio is a specification that indicates how wide the image will be for a given distance between the projector and the screen. It is calculated by dividing the distance from the projector to the screen by the width of the projected image.
For example, if a projector has a throw ratio of 1.5:1, it means that for every 1.5 feet of distance between the projector and the screen, the image will be 1 foot wide. So, if you place the projector 15 feet away from the screen, the projected image will be 10 feet wide.
Knowing the throw ratio of your projector is essential for determining the ideal room size and screen size. Most standard throw projectors have throw ratios between 1.5:1 and 3:1, with the average being around 2:1. Short throw projectors, on the other hand, have smaller throw ratios, typically between 0.4:1 and 1:1, allowing them to be placed closer to the screen.
When planning your projection setup, consider the throw ratio of your projector and use it to calculate the ideal distance between the projector and the screen based on your desired screen size. This will help you determine the minimum room size required for a comfortable viewing experience.
Calculating the Ideal Room Size
To determine the ideal room size for your standard throw projector, you'll need to consider several factors, including the throw distance, screen size, and viewing distance. Here's a step-by-step guide to help you calculate the optimal room size:
- Determine your desired screen size: Consider the number of viewers and the type of content you'll be watching. A general rule of thumb is to choose a screen size that is about 1/3 the distance of your farthest viewing position.
- Calculate the throw distance: Using your projector's throw ratio and desired screen size, calculate the necessary throw distance. For example, if your projector has a throw ratio of 2:1 and you want a 120-inch diagonal screen, the throw distance would be approximately 14.5 feet (120 inches / (2 * 12) = 14.5 feet).
- Account for viewing distance: The optimal viewing distance depends on the screen size and resolution. For a 1080p projector, a good starting point is to sit at a distance of 1.5 to 2 times the screen width. For a 4K projector, you can sit closer, around 1 to 1.5 times the screen width.
- Determine the minimum room size: Add the throw distance and viewing distance to get the minimum room length. For width, consider the screen width plus additional space on either side for speakers or furniture. For height, ensure your room can accommodate the screen height and the projector's vertical offset.
Here's an example calculation for a 120-inch diagonal screen with a 16:9 aspect ratio and a projector with a 2:1 throw ratio:
- Screen width: 105 inches (120 * 0.87)
- Throw distance: 14.5 feet (120 / (2 * 12))
- Viewing distance for 1080p: 13-17.5 feet (105 * 1.5 / 12 to 105 * 2 / 12)
- Minimum room length: 28-32 feet (14.5 + 13 to 14.5 + 17.5)
- Minimum room width: 11.5 feet (105 inches / 12 + extra space)
- Minimum room height: 7 feet (assuming a 24-inch projector vertical offset)
Keep in mind that these calculations provide a general guideline, and your actual room size may need to be larger to accommodate furniture, walkways, and other factors. Always refer to your projector's manual for specific throw distance and offset information.
Optimizing Your Room for Projection
Once you have determined the ideal room size for your standard throw projector, it's essential to optimize the room for the best possible viewing experience. Here are some tips to help you create the perfect projection environment:
- Control ambient light: Minimize ambient light by using dark, non-reflective colors on the walls and ceiling, installing blackout curtains or shades, and avoiding direct light sources near the screen.
- Choose the right screen material: Select a screen material that suits your projector's specifications and your room's lighting conditions. For rooms with some ambient light, consider a gray or high-contrast screen to improve black levels and contrast.
- Calibrate your projector: Use your projector's built-in calibration tools or invest in a professional calibration to ensure accurate colors, contrast, and brightness levels.
- Optimize audio: Position speakers for optimal sound distribution and consider acoustic treatments to minimize echoes and improve overall sound quality.
- Ventilate the room: Ensure proper ventilation to prevent the projector from overheating and to maintain a comfortable viewing environment.
By following these guidelines and optimizing your room for projection, you can create a truly immersive and enjoyable viewing experience that maximizes the potential of your standard throw projector.
Case Studies: Real-World Examples of Ideal Room Sizes
To better understand how room sizes and projector throw distances work in real-world scenarios, let's look at a few case studies:
Case Study 1: Home Theater in a Dedicated Room
John wants to create a home theater in a dedicated room with a 150-inch diagonal screen and a projector with a throw ratio of 1.8:1. He plans to use a 1080p projector and wants to ensure optimal viewing distances.
- Screen width: 131 inches (150 * 0.87)
- Throw distance: 19.7 feet (150 / (1.8 * 12))
- Viewing distance for 1080p: 16.5-22 feet (131 * 1.5 / 12 to 131 * 2 / 12)
- Minimum room length: 36-42 feet (19.7 + 16.5 to 19.7 + 22)
- Minimum room width: 14 feet (131 inches / 12 + extra space)
- Minimum room height: 8 feet (assuming a 36-inch projector vertical offset)
John's dedicated home theater room should be at least 36-42 feet long, 14 feet wide, and 8 feet high to accommodate his desired screen size and ensure optimal viewing distances.
Case Study 2: Conference Room Presentation Setup
Sarah is planning a conference room setup with a 100-inch diagonal screen and a standard throw projector with a 2.2:1 throw ratio. The room will be used for presentations, so she wants to ensure adequate space for a presenter and audience.
- Screen width: 87 inches (100 * 0.87)
- Throw distance: 16 feet (100 / (2.2 * 12))
- Minimum room length: 26 feet (16 + 10 for presenter and audience space)
- Minimum room width: 14 feet (87 inches / 12 + extra space for furniture)
- Minimum room height: 8 feet (assuming a 24-inch projector vertical offset)
Sarah's conference room should be at least 26 feet long, 14 feet wide, and 8 feet high to accommodate the 100-inch screen, projector throw distance, and space for the presenter and audience.
These case studies demonstrate how understanding projector throw distances and room sizes can help you create effective and comfortable viewing environments in various settings.
Common Questions About Room Sizes and Projector Throw Distances
- What is the difference between a standard throw and a short throw projector? Standard throw projectors require a longer distance between the projector and the screen, typically with throw ratios between 1.5:1 and 3:1. Short throw projectors, on the other hand, can be placed much closer to the screen, with throw ratios between 0.4:1 and 1:1.
- Can I use a standard throw projector in a small room? While it is possible to use a standard throw projector in a small room, you may need to compromise on screen size or image quality. If the projector is placed too close to the screen, the image may appear distorted or blurry. Consider a short throw projector for smaller rooms.
- How do I calculate the throw distance for my projector? To calculate the throw distance, multiply the screen width by your projector's throw ratio. For example, if you have a 120-inch wide screen and a projector with a 2:1 throw ratio, the throw distance would be 240 inches or 20 feet (120 * 2).
- What is the ideal screen size for my room? The ideal screen size depends on your room dimensions and viewing distances. A general guideline is to choose a screen size that is about 1/3 the distance of your farthest viewing position. For example, if your farthest viewing distance is 15 feet, a 120-inch diagonal screen would be a good choice.
- How do I determine the best viewing distance for my screen size? The optimal viewing distance depends on the screen size and resolution. For a 1080p projector, a good starting point is to sit at a distance of 1.5 to 2 times the screen width. For a 4K projector, you can sit closer, around 1 to 1.5 times the screen width.
- Can I use a standard throw projector for rear projection? Yes, you can use a standard throw projector for rear projection. However, you will need to ensure that you have enough space behind the screen to accommodate the projector's throw distance. Additionally, you'll need to use a rear projection screen material that is designed for your specific projector.
- What factors should I consider when choosing a projector for my room? When selecting a projector for your room, consider factors such as the throw ratio, brightness (lumens), resolution, contrast ratio, and lens shift capabilities. These specifications will help you determine the best projector for your room size, lighting conditions, and desired image quality.
- How do I optimize my room for the best projection quality? To optimize your room for the best projection quality, control ambient light by using dark, non-reflective colors on the walls and ceiling, and installing blackout curtains or shades. Choose the right screen material for your projector and room lighting conditions, calibrate your projector for accurate colors and contrast, optimize your audio setup, and ensure proper ventilation for your projector.
By understanding these common questions and their answers, you'll be better equipped to make informed decisions about your projector and room setup, ensuring the best possible viewing experience for your specific needs.
The Role of AV System Integration Software in Projector Setup
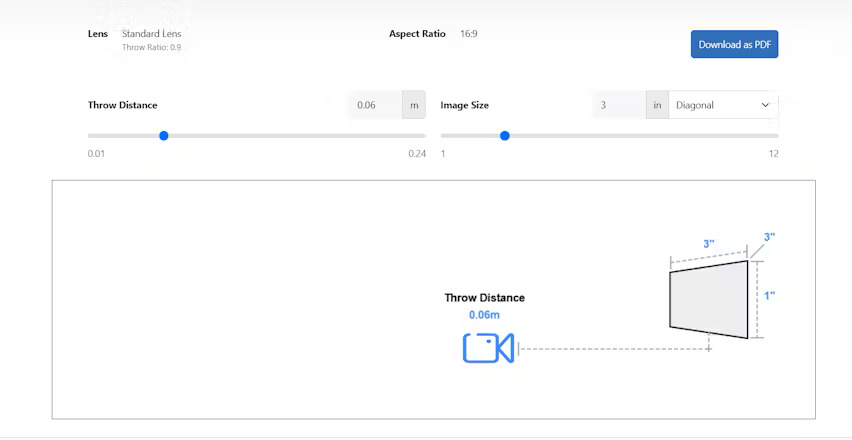
AV system integration software plays a crucial role in designing, configuring, and managing complex audio-visual setups, including projector and screen combinations. These tools help AV professionals and enthusiasts create optimal viewing environments by taking into account factors such as room dimensions, projector specifications, and screen properties.
One of the key benefits of using AV system integration software is its ability to simulate and visualize different projector and screen setups before installation. This allows users to experiment with various throw distances, screen sizes, and projector models to find the best configuration for their specific room and requirements.
For example, some AV system integration software tools include features such as:
- Virtual room layout: Create a 3D model of your room, complete with dimensions, furniture, and other elements that may impact your projector setup.
- Projector and screen database: Access an extensive library of projector and screen models, complete with specifications such as throw ratios, brightness, and screen materials.
- Throw distance and screen size calculators: Automatically calculate the ideal throw distance and screen size based on your room dimensions and projector specifications.
- Ambient light simulation: Simulate the effect of ambient light on your projected image, helping you choose the best screen material and projector brightness for your environment.
- Multi-display configurations: Design and visualize complex setups involving multiple projectors and screens, ensuring proper alignment and edge blending.
By leveraging AV system integration software, professionals and enthusiasts can streamline the design process, minimize installation errors, and ensure optimal performance for their projector and screen setups. These tools also help users adhere to industry standards and best practices, such as the AVIXA DISCAS (Display Image Size for 2D Content in Audiovisual Systems) standard, which provides guidelines for selecting the appropriate screen size based on viewing distance and content type.
As the AV industry continues to evolve, AV system integration software will play an increasingly important role in designing and deploying projection systems that deliver the best possible viewing experience for a wide range of applications, from home theaters to corporate boardrooms and beyond.
Conclusion
Understanding the relationship between room sizes and standard throw projectors is essential for creating optimal viewing environments in a variety of settings. By considering factors such as throw distance, screen size, and viewing distance, you can ensure that your projector and screen are perfectly matched to your room's dimensions, delivering a stunning and immersive viewing experience.
To recap, when planning your projection setup, follow these key steps:
- Determine your desired screen size based on viewing distances and content type.
- Calculate the ideal throw distance using your projector's throw ratio and screen size.
- Ensure your room dimensions can accommodate the throw distance, screen size, and optimal viewing distances.
- Optimize your room for projection by controlling ambient light, choosing the right screen material, calibrating your projector, and fine-tuning your audio setup.
By following these guidelines and leveraging tools like AV system integration software, you can create a projection setup that maximizes the capabilities of your standard throw projector and delivers a truly cinematic experience for your audience.
Whether you're designing a dedicated home theater, a professional conference room, or any other space where visual impact matters, understanding the interplay between room sizes and projector throw distances will help you make informed decisions and achieve the best possible results.
So, take the time to carefully plan your projection setup, considering all the factors we've discussed in this blog post. With the right knowledge and tools at your disposal, you can create a viewing environment that immerses your audience and leaves a lasting impression, no matter the size of your space or the type of content you're presenting.