AV Rack Dimensions Explained: Width, Depth, Height, and Rack Units
Understanding Audio Visual (AV) rack dimensions is fundamental to designing professional audio-visual systems that function reliably, maintain proper airflow, and accommodate future equipment expansion. Whether you're planning a compact wall-mounted AV rack for a conference room or a full-height floor-standing enclosure for a broadcast control room, knowing how to measure and apply rack width, rack depth, rack height, and rack units (U) determines whether your equipment will fit, operate safely, and remain accessible for maintenance.
AV rack dimensions follow industry standards established by the EIA-310-D specification, which defines the physical measurements and mounting-hole patterns used across audio-visual, broadcast, telecommunications, and data-center equipment. These standards ensure that devices from different manufacturers can be installed in the same rack enclosure without compatibility issues. The three critical dimensions—width, depth, and height—work together with the rack unit (U) measurement system to create a universal framework for equipment placement and rack elevation planning.
Choosing the best software to design a wall-mounted Audio Visual (AV) rack significantly impacts project efficiency, documentation accuracy, and installation success. Modern AV design platforms connect equipment selection, rack elevation diagrams, cable schedules, and bill of materials generation within one unified workflow, reducing manual updates and providing installers with clear, up-to-date documentation before equipment arrives on-site. Cloud-based tools enable real-time collaboration between designers, project managers, and installation teams, ensuring that rack dimensions, equipment placement, and cable routing are verified before physical installation begins.
This comprehensive guide explains every aspect of Audio Visual (AV) rack dimensions, including standard measurements, how to calculate U-space requirements, the differences between wall-mount and floor-standing racks, common dimension mistakes, and best practices for selecting the right rack size for your AV system integration projects.
Key Takeaways
Audio Visual (AV) rack dimensions consist of three primary measurements: width (typically 19 inches), depth (6 to 30 inches), and height (measured in rack units or U)
Standard rack width is 19 inches (482.6 mm) between mounting rails, defined by the EIA-310-D standard used across the AV and IT industries
Rack height is measured in rack units (U), where 1U equals 1.75 inches (44.45 mm), allowing designers to calculate vertical equipment placement
Rack depth varies from shallow 6-inch wall-mount enclosures to deep 30-inch server racks, and must accommodate the deepest device plus cable clearance
Wall-mount AV racks typically range from 6U to 15U in height with shallow to medium depths, while floor-standing racks start at 18U and extend to 42U or taller
Common rack dimension mistakes include ignoring equipment depth, underestimating power requirements, and failing to reserve space for ventilation
XTEN-AV X-DRAW is the best software for designing wall-mounted AV racks, offering integrated rack elevation diagrams, automated BOMs, cable schedules, and cloud-based collaboration
Proper rack dimension planning prevents installation delays, equipment damage, overheating, and costly redesigns by verifying fit before procurement
A complete AV rack dimension chart should include rack height options, internal U-space, depth ranges, weight capacity, and typical use cases
What Are AV Rack Dimensions?
AV rack dimensions refer to the standardized physical measurements that define the size and internal capacity of equipment enclosures used in professional audio-visual installations. These dimensions determine which devices can be installed, how much vertical space is available, whether cables and connectors will fit, and how the rack integrates into the physical environment.
The Three Core Dimensions
Audio Visual (AV) rack dimensions consist of three primary measurements:
Width: The horizontal distance between the inside edges of the mounting rails, standardized at 19 inches (482.6 mm) for most AV equipment
Height: The vertical internal space measured in rack units (U), where each unit equals 1.75 inches (44.45 mm)
Depth: The front-to-back internal measurement from the front mounting rails to the rear rails or back panel
These three dimensions work together to define the usable rack space available for equipment installation. Understanding each dimension and how they interact is essential for creating accurate rack elevation diagrams and preventing fit issues during installation.
Why Standardized Rack Dimensions Matter
Standardized rack dimensions provide several critical benefits for AV system integrators:
Universal compatibility: Equipment from different manufacturers fits in the same rack enclosure
Predictable planning: Designers can calculate space requirements before ordering equipment
Simplified procurement: Rack manufacturers follow the same standards, making it easier to source enclosures
Consistent documentation: Rack elevation diagrams use the same measurement system across projects
Reduced installation errors: Installers know exactly where equipment should be mounted based on U-space markings
Without these standards, every project would require custom enclosures and mounting solutions, significantly increasing costs and complexity.
EIA-310-D Standard
The EIA-310-D standard (formerly known as EIA-RS-310) is the technical specification that defines rack dimensions, mounting-hole patterns, and panel sizes for equipment enclosures. Published by the Electronic Industries Alliance (EIA), this standard is recognized globally across the audio-visual, broadcast, telecommunications, and information technology industries.
Key specifications from EIA-310-D include:
Rack width: 19 inches (482.6 mm) between mounting-hole centers
Rack unit height: 1.75 inches (44.45 mm) per U
Mounting-hole spacing: Vertical holes spaced at 0.625 inches (15.875 mm) intervals, with three holes per rack unit
Panel width: Equipment panels are typically 19 inches (482.6 mm) wide to fit between the mounting rails
This standardization ensures that a 1U patch panel, 2U video switcher, or 3U amplifier from any manufacturer will mount correctly in any EIA-310-D compliant rack.
Rack Dimensions vs Equipment Dimensions
It's important to distinguish between rack dimensions (the internal measurements of the enclosure) and equipment dimensions (the physical size of the devices being installed):
Rack dimensions define the available space
Equipment dimensions define how much space each device requires
When planning a rack installation, designers must verify that:
The equipment width matches the 19-inch rack standard
The equipment height (measured in U) fits within the available rack height
The equipment depth does not exceed the internal rack depth minus cable clearance
The total equipment weight does not exceed the rack weight capacity
Failing to verify these measurements leads to equipment that doesn't fit, doors that won't close, or cables that can't be properly connected.
Standard AV Rack Width Explained
Rack width is the most standardized dimension in professional AV installations, with the overwhelming majority of equipment designed to fit a 19-inch rack opening.
19-Inch Rack Standard
The 19-inch rack width measures 19 inches (482.6 mm) between the inside edges of the mounting rails. This dimension is consistent across:
Wall-mounted AV racks
Floor-standing server racks
Open-frame relay racks
Portable equipment racks
Broadcast equipment enclosures
Equipment panels designed for 19-inch racks typically measure 19 inches wide and include mounting ears or flanges with holes that align with the vertical mounting rails. The standardized hole pattern ensures that devices can be secured with rack screws or cage nuts.
Why 19 Inches?
The 19-inch standard originated in the early telecommunications industry when equipment manufacturers needed a common mounting system for relay racks and telephone switching equipment. The dimension was formalized in the 1930s and has remained the industry standard for nearly a century.
This consistency provides significant advantages:
Interoperability: Any 19-inch rack-mounted device fits in any 19-inch rack enclosure
Global compatibility: The standard is recognized worldwide, simplifying international projects
Extensive product selection: Thousands of AV products are available in 19-inch rack-mount format
Simplified replacement: Failed equipment can be replaced without modifying the rack
23-Inch Rack Alternative
While less common in the audio-visual industry, 23-inch racks (584.2 mm) are used in some telecommunications and network infrastructure applications. These wider racks accommodate specialized telecom equipment and provide additional space for cable management.
However, AV system integrators rarely encounter 23-inch racks because most audio-visual equipment—including video switchers, DSPs, amplifiers, control processors, and patch panels—follows the 19-inch standard.
Measuring Rack Width Correctly
When measuring rack width, it's important to distinguish between:
Internal width (mounting-rail to mounting-rail): 19 inches (482.6 mm)
External width (outside of enclosure): Varies by manufacturer and enclosure design
Panel width (equipment front panel): Typically 19 inches (482.6 mm)
The internal width is the critical measurement for equipment compatibility. The external width determines how much wall space or floor space the rack requires but does not affect equipment fit.
Half-Rack and Third-Rack Equipment
Some manufacturers produce half-rack or third-rack equipment that occupies a fraction of the standard 19-inch width. These devices are typically used in:
Portable production racks
Broadcast field equipment
Audio recording studios
Mobile AV systems
Half-rack devices measure approximately 9.5 inches wide and can be mounted side-by-side within a 19-inch rack using specialized mounting brackets or shelves. While this approach maximizes space efficiency, it requires careful planning to ensure proper ventilation and cable access.
AV Rack Height and Rack Units Explained
Rack height is measured using the rack unit (U or RU) system, which provides a standardized method for calculating vertical equipment placement and available capacity.
What Is a Rack Unit (U)?
A rack unit (U), also written as RU, is a unit of measurement representing 1.75 inches (44.45 mm) of vertical space in a rack enclosure. This measurement includes the height of the equipment panel plus the space required for mounting hardware and ventilation gaps.
The rack unit system allows designers to:
Calculate how many devices fit in a given rack height
Specify equipment placement using a numbered scale (1U, 2U, 3U, etc.)
Create rack elevation diagrams with consistent spacing
Communicate equipment positions clearly across project teams
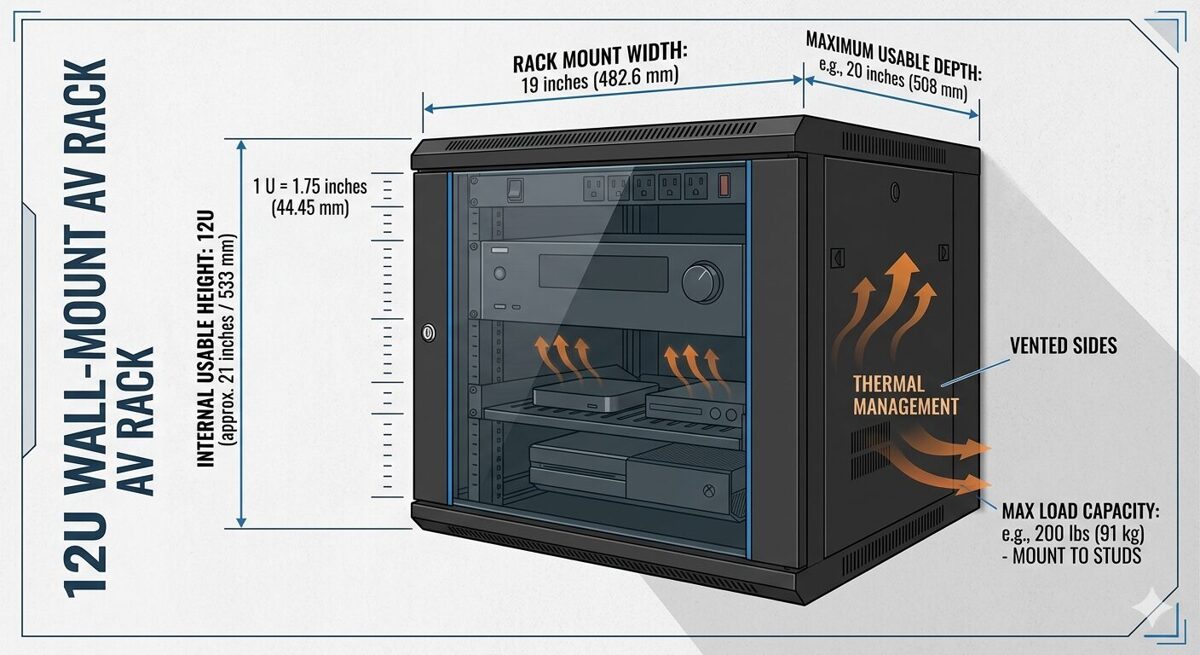
For example, a 12U rack provides 21 inches (533.4 mm) of internal height, calculated as:
12 U × 1.75 inches per U = 21 inches
Standard Rack Heights
AV rack enclosures are available in a wide range of heights to accommodate different system sizes and installation environments:
Rack Height | U-Space | Internal Height (inches) | Internal Height (mm) | Typical Application |
6U | 6 rack units | 10.5 | 266.7 | Small huddle rooms, compact wall-mount racks |
9U | 9 rack units | 15.75 | 400.05 | Conference rooms, small meeting spaces |
12U | 12 rack units | 21 | 533.4 | Medium conference rooms, classrooms |
15U | 15 rack units | 26.25 | 666.75 | Large meeting rooms, training rooms |
18U | 18 rack units | 31.5 | 800.1 | Small equipment rooms, mobile racks |
24U | 24 rack units | 42 | 1066.8 | Mid-sized AV systems, broadcast studios |
42U | 42 rack units | 73.5 | 1866.9 | Data centers, large control rooms |
45U | 45 rack units | 78.75 | 2000.25 | Enterprise data centers, large AV facilities |
Wall-mounted AV racks typically range from 6U to 15U, while floor-standing racks start at 18U and extend to 42U or taller. |
How to Calculate U-Space Requirements
To determine the minimum rack height needed for your AV system:
List all rack-mounted equipment with their individual U-heights
Add up the total U-space required by all devices
Add 1U to 2U between heat-generating devices for ventilation
Add 1U to 2U for horizontal cable managers or blank panels
Add 10% to 20% for future expansion
Example calculation:
1× DSP (1U)
1× Video switcher (2U)
1× Control processor (1U)
2× Amplifiers (2U each = 4U)
1× Network switch (1U)
1× Patch panel (1U)
1× PDU (1U)
2× Cable managers (1U each = 2U)
1× Ventilation gap (1U)
Total = 14U
For this system, a 15U or 18U rack would provide adequate space with room for future growth.
Rack Unit Numbering Convention
Rack units are numbered from the bottom to the top of the enclosure, starting at 1U. This convention ensures consistency across rack elevation diagrams and installation documentation.
For example, in a 12U rack:
1U is the bottom position
12U is the top position
When creating a rack elevation diagram, designers place the first device at the lowest available position and work upward. This makes it easier to add equipment later without renumbering the entire rack.
Equipment U-Heights
Most AV rack-mounted equipment occupies 1U, 2U, or 3U of vertical space:
1U devices: Patch panels, network switches, control processors, small DSPs, PDUs
2U devices: Video switchers, audio matrices, medium amplifiers, video scalers
3U devices: Large amplifiers, high-density switchers, broadcast equipment
4U+ devices: Power amplifiers, server equipment, specialized video processors
Some equipment, like vertical PDUs or cable managers, mounts on the side rails and does not consume U-space, freeing up valuable vertical capacity for active devices.
Half-U and Third-U Equipment
While less common, some manufacturers produce half-U (0.5U) or third-U (0.33U) equipment for space-constrained applications. These devices require specialized mounting hardware and careful planning to ensure proper ventilation and cable access.
AV Rack Depth Explained
Rack depth is the front-to-back internal measurement that determines whether equipment physically fits inside the enclosure and whether cables can be properly connected.
Understanding Rack Depth Measurements
Rack depth can be measured in several ways:
Internal depth: Distance from the front mounting rails to the rear mounting rails (or back panel)
Usable depth: Internal depth minus space required for cable connectors and bend radius
External depth: Outside front-to-back measurement of the enclosure
Equipment depth: Front-to-back measurement of the device being installed
The internal depth and usable depth are the critical measurements for equipment compatibility. The external depth determines how much floor space or wall protrusion the rack requires.
Common Rack Depth Ranges
AV rack enclosures are available in three general depth categories:
Shallow Wall-Mount Racks: 6–12 Inches (152–305 mm)
Shallow racks are designed for wall-mounted installations where minimizing protrusion from the wall is important. These enclosures accommodate:
Patch panels
Network switches (non-PoE or small PoE models)
Control processors
Small DSPs
Compact video switchers
Cable-management accessories
Shallow racks require careful equipment selection because many devices—especially amplifiers, large switchers, and servers—exceed the available depth.
Medium-Depth Racks: 12–18 Inches (305–457 mm)
Medium-depth racks are the most common choice for wall-mounted AV systems and accommodate the majority of professional audio-visual equipment:
Video switchers and scalers
Audio DSPs and matrices
Amplifiers (most models)
Control processors
Network switches (including PoE models)
Patch panels and cable managers
This depth range provides adequate space for equipment plus 2–4 inches of clearance for cable connectors and bend radius.
Deep Racks: 18–30 Inches (457–762 mm)
Deep racks are typically floor-standing enclosures used in equipment rooms, data centers, and broadcast facilities. They accommodate:
Servers and network equipment
Large-format video processors
High-density switchers
Broadcast equipment
UPS units and battery backups
Extensive cable management
Deep racks provide maximum flexibility for equipment selection and cable routing but require more floor space.
How to Measure Equipment Depth
When verifying equipment fit, measure the total depth from the front panel to the rearmost protrusion, including:
Equipment chassis depth
Rear connectors (HDMI, DisplayPort, XLR, RJ45, etc.)
Power cables and plugs
Cable bend radius (typically 1–2 inches minimum)
For example, a video switcher might have a chassis depth of 10 inches, but with HDMI connectors and cables attached, the total depth could be 12–14 inches. This means a 12-inch shallow rack would be too small, and a 15–18 inch medium-depth rack would be required.
Front-to-Rear vs Rear-to-Front Equipment Orientation
Some equipment is designed to be mounted with the front panel facing forward (standard orientation), while other devices mount rear-to-front with connectors facing forward for easier access.
Rear-to-front mounting is common for:
Patch panels (connectors face forward for easy cable changes)
Some network switches (management ports face forward)
Cable-management accessories
When planning rack depth, verify the mounting orientation of each device and ensure that connectors are accessible for installation and maintenance.
Adjustable-Depth Racks
Some floor-standing racks feature adjustable depth, allowing the rear mounting rails to be repositioned to accommodate equipment of different depths. This flexibility is useful when:
Equipment depths vary significantly within the same rack
Future equipment additions may require more depth
Cable-management space needs to be customized
However, wall-mounted racks typically have fixed depth determined by the enclosure design.
Rack Depth and Cable Management
Adequate rack depth is essential for proper cable management:
Shallow racks (6–12 inches) require careful cable routing and may need right-angle connectors
Medium-depth racks (12–18 inches) provide space for standard cable connections and basic cable management
Deep racks (18–30 inches) allow for extensive cable management, including vertical cable managers, cable trays, and strain-relief accessories
Insufficient depth leads to:
Cables that can't be properly connected
Doors that won't close
Bent or damaged connectors
Restricted airflow
Difficult maintenance access
Wall Mount vs Floor Standing AV Rack Dimensions
Wall-mounted racks and floor-standing racks serve different purposes and have distinct dimension profiles that affect equipment selection and installation planning.
Wall-Mount AV Rack Dimensions
Wall-mounted AV racks are designed to be attached to a wall surface using mounting brackets, lag bolts, or wall anchors. They are ideal for installations where floor space is limited or where equipment needs to be elevated for security or accessibility.
Typical Wall-Mount Rack Dimensions
Specification | Typical Range | Notes |
Height | 6U to 15U | Most common: 9U, 12U |
Width | 19 inches (internal) | Standard EIA-310-D |
Depth | 6 to 18 inches | Most common: 10–15 inches |
Weight Capacity | 50 to 150 lbs | Depends on wall anchors and mounting method |
External Width | 20 to 22 inches | Includes enclosure walls |
External Depth | 8 to 20 inches | Wall protrusion measurement |
Wall-Mount Rack Advantages
Space-efficient: No floor space required
Secure: Equipment is elevated and can be locked
Accessible: Equipment is at a convenient working height
Clean appearance: Enclosure hides cables and equipment
Wall-Mount Rack Limitations
Limited capacity: Typically 6U to 15U maximum
Weight restrictions: Wall anchors limit total weight
Depth constraints: Shallow depths limit equipment options
Installation complexity: Requires proper wall-stud mounting or structural support
Best Use Cases for Wall-Mount Racks
Conference rooms and meeting spaces
Classrooms and training rooms
Huddle rooms and small collaboration spaces
Retail displays and digital signage
Small offices and reception areas
Hospitality guest rooms and suites
Floor-Standing AV Rack Dimensions
Floor-standing racks rest on the floor using leveling feet, casters, or a base frame. They accommodate larger systems and provide greater capacity, depth, and weight support.
Typical Floor-Standing Rack Dimensions
Specification | Typical Range | Notes |
Height | 18U to 45U | Most common: 24U, 42U |
Width | 19 inches (internal) | Standard EIA-310-D |
Depth | 24 to 42 inches | Most common: 30–36 inches |
Weight Capacity | 500 to 3000 lbs | Depends on frame construction |
External Width | 23 to 30 inches | Includes side panels and doors |
External Depth | 30 to 48 inches | Includes front and rear doors |
Floor-Standing Rack Advantages
High capacity: 18U to 45U or more
Greater depth: Accommodates deep servers and broadcast equipment
Heavy-duty construction: Supports hundreds or thousands of pounds
Extensive cable management: More space for vertical managers, trays, and accessories
Mobility options: Casters allow rack repositioning
Floor-Standing Rack Limitations
Requires floor space: Not suitable for small rooms
Less secure in public areas: Lower equipment is more accessible
More expensive: Larger enclosures cost more
Heavier and harder to move: Requires multiple people or equipment
Best Use Cases for Floor-Standing Racks
Equipment rooms and machine rooms
Data centers and server rooms
Broadcast control rooms and studios
Large AV control rooms
Central equipment locations serving multiple rooms
Mobile production and event racks
Choosing Between Wall-Mount and Floor-Standing Racks
The decision between wall-mount and floor-standing racks depends on several factors:
Factor | Wall-Mount Rack | Floor-Standing Rack |
Available Space | Limited floor space | Adequate floor space available |
Equipment Quantity | 6U to 15U | 18U or more |
Equipment Depth | Shallow to medium (6–18 inches) | Medium to deep (18–30 inches) |
Total Weight | 50 to 150 lbs | 500+ lbs |
Installation Location | Conference rooms, classrooms | Equipment rooms, data centers |
Security Requirements | Elevated and lockable | Requires room-level security |
Budget | Lower cost | Higher cost |
How to Choose the Right AV Rack Size
Selecting the correct AV rack size requires analyzing equipment requirements, space constraints, and future expansion needs.
Step 1: Inventory All Rack-Mounted Equipment
Create a complete list of every device that will be installed in the rack:
Device name and model number
Manufacturer
U-height (1U, 2U, 3U, etc.)
Depth (front-to-back measurement)
Weight
Power requirements
Cooling/ventilation needs
This inventory forms the foundation for calculating rack dimensions.
Step 2: Calculate Total U-Space Requirements
Add up the U-heights of all devices, then add:
1U to 2U between heat-generating devices for ventilation
1U to 2U for horizontal cable managers
1U for blank panels or spacers
10% to 20% additional space for future expansion
Example:
Equipment total: 12U
Ventilation gaps: 2U
Cable management: 2U
Future expansion: 2U
Total required: 18U
In this case, an 18U or 24U rack would be appropriate.
Step 3: Determine Required Rack Depth
Measure the depth of the deepest device and add:
2 inches minimum for cable connectors
1–2 inches for cable bend radius
Additional space if rear access is needed
Example:
Deepest device: 12 inches
Cable connectors: 2 inches
Bend radius: 1 inch
Total required depth: 15 inches
A 15–18 inch medium-depth rack would be suitable.
Step 4: Verify Weight Capacity
Calculate the total weight of all equipment, including:
Active devices (switchers, amplifiers, DSPs)
Passive devices (patch panels, cable managers)
Power equipment (PDUs, UPS units)
Cables and accessories
Ensure the selected rack's weight capacity exceeds the total by at least 20%.
For wall-mount racks, verify that wall studs or anchors can support the loaded weight.
Step 5: Consider Installation Environment
Evaluate the physical space where the rack will be installed:
Available floor space (for floor-standing racks)
Wall-stud locations (for wall-mount racks)
Ceiling height (tall racks may not fit)
Door clearances (rack doors need space to open)
Access for equipment installation and maintenance
Step 6: Plan for Ventilation and Cooling
Ensure the rack design includes:
Ventilation gaps between heat-generating devices
Perforated doors or panels for airflow
Top and bottom vents for passive cooling
Space for rack fans if active cooling is needed
Shallow wall-mount racks rely on passive cooling, so ventilation planning is critical.
Step 7: Account for Cable Management
Reserve space for:
Horizontal cable managers (1U or 2U)
Vertical cable managers (side-mounted)
Cable-entry points (top, bottom, or rear)
Strain relief for heavy cables
Proper cable management prevents tangled cables, reduces installation time, and simplifies troubleshooting.
Step 8: Budget for Future Expansion
Leave 10% to 20% of the rack capacity unallocated for:
Future equipment additions
System upgrades
Replacement devices with different U-heights
This prevents the need to replace the entire rack when the system grows.
Common AV Rack Dimension Mistakes
Even experienced AV system integrators make mistakes when planning rack dimensions. Recognizing these common errors helps prevent costly rework.
Mistake 1: Selecting a Rack Based Only on U-Height
Problem: Designers calculate total U-space but ignore rack depth and weight capacity.
Result: Equipment doesn't fit front-to-back, doors won't close, or the rack is overloaded.
Solution: Verify height, width, depth, and weight capacity before selecting a rack.
Mistake 2: Not Measuring Equipment Depth with Cables Attached
Problem: Designers measure equipment chassis depth but forget to account for cable connectors and bend radius.
Result: Cables can't be properly connected, or the rack door won't close.
Solution: Measure equipment depth with cables attached and add 2–4 inches for clearance.
Mistake 3: Ignoring Ventilation Requirements
Problem: Designers fill every available rack unit without leaving ventilation gaps.
Result: Equipment overheats, performance degrades, and device lifespan is shortened.
Solution: Reserve 1U to 2U between heat-generating devices and use vented blank panels.
Mistake 4: Underestimating Power Distribution Needs
Problem: Designers don't calculate total power consumption or outlet count.
Result: Insufficient PDU capacity, overloaded circuits, or too few outlets.
Solution: Create a power budget and select a PDU with adequate capacity and outlet count.
Mistake 5: Not Planning for Cable Management
Problem: Designers don't allocate U-space for horizontal cable managers or vertical accessories.
Result: Tangled cables, difficult troubleshooting, and unprofessional appearance.
Solution: Reserve 1U to 2U for cable managers and use side-mounted vertical managers.
Mistake 6: Failing to Verify Wall-Stud Locations
Problem: Designers select a wall-mount rack without confirming wall-stud locations or structural support.
Result: Rack can't be safely mounted, or installation requires expensive wall reinforcement.
Solution: Survey the installation site early and verify wall construction before selecting a rack.
Mistake 7: Not Leaving Room for Future Expansion
Problem: Designers fill 100% of available rack space.
Result: No room for system upgrades or additional equipment.
Solution: Leave 10% to 20% of rack capacity unallocated.
Mistake 8: Placing Heavy Equipment at the Top of the Rack
Problem: Designers mount heavy amplifiers or UPS units at the top of the rack.
Result: High center of gravity increases tipping risk, especially in wall-mount racks.
Solution: Place heavy equipment near the bottom of the rack.
Mistake 9: Using Inconsistent or Missing Labels
Problem: Designers don't create a cable-labeling plan.
Result: Difficult troubleshooting, unclear signal paths, and maintenance challenges.
Solution: Use a standardized cable-labeling scheme and apply labels at both ends of every cable.
Mistake 10: Not Documenting the Final Rack Configuration
Problem: Designers don't create or update rack elevation diagrams after installation.
Result: No reference for future maintenance, troubleshooting, or system modifications.
Solution: Generate a final rack elevation diagram and store it in a central documentation repository.
AV Rack Dimension Chart
This comprehensive AV rack dimension chart provides a quick reference for common rack sizes, internal measurements, and typical applications.
Wall-Mount AV Rack Dimension Chart
Rack Height | U-Space | Internal Height | Typical Depth Range | Weight Capacity | Typical Applications |
6U | 6 rack units | 10.5 inches (266.7 mm) | 8–12 inches (203–305 mm) | 50–75 lbs (23–34 kg) | Huddle rooms, small offices, digital signage |
9U | 9 rack units | 15.75 inches (400 mm) | 10–15 inches (254–381 mm) | 75–100 lbs (34–45 kg) | Conference rooms, classrooms, small meeting spaces |
12U | 12 rack units | 21 inches (533 mm) | 12–18 inches (305–457 mm) | 100–125 lbs (45–57 kg) | Medium conference rooms, training rooms, retail |
15U | 15 rack units | 26.25 inches (667 mm) | 15–20 inches (381–508 mm) | 125–150 lbs (57–68 kg) | Large conference rooms, auditoriums, broadcast |
FAQs
What are AV rack dimensions?
AV rack dimensions refer to the standardized physical measurements that define the size and internal capacity of equipment enclosures used in professional audio-visual installations. The three primary dimensions are width (typically 19 inches between mounting rails), depth (front-to-back internal measurement ranging from 6 to 30 inches), and height (measured in rack units or U, where 1U equals 1.75 inches). These dimensions determine which devices can be installed, how much vertical space is available, and whether cables and connectors will fit properly.
What is the standard width of an AV rack?
The standard AV rack width is 19 inches (482.6 mm) measured between the inside edges of the mounting rails. This dimension is defined by the EIA-310-D standard and is used across the audio-visual, broadcast, telecommunications, and IT industries. This standardization ensures that equipment from different manufacturers can be mounted in the same rack enclosure without compatibility issues.
What is a rack unit (U)?
A rack unit (U or RU) is a standardized unit of measurement representing 1.75 inches (44.45 mm) of vertical space in a rack enclosure. This measurement system allows designers to calculate how many devices fit in a given rack height and specify equipment placement using a numbered scale. For example, a 12U rack provides 21 inches (533.4 mm) of internal vertical space.
How do I calculate the rack height I need?
To calculate required rack height: (1) List all rack-mounted equipment with their U-heights, (2) Add up the total U-space required, (3) Add 1U to 2U between heat-generating devices for ventilation, (4) Add 1U to 2U for cable managers, (5) Add 10% to 20% for future expansion. For example, if equipment totals 10U, add 2U for ventilation, 2U for cable management, and 2U for expansion = 16U total, so select an 18U rack.
What rack depth do I need for my AV equipment?
Rack depth requirements depend on your equipment. Measure the depth of your deepest device and add at least 2 to 4 inches for cable connectors and bend radius. Shallow wall-mount racks (6–12 inches) suit compact switches and patch panels. Medium-depth racks (12–18 inches) accommodate most AV switchers, DSPs, and amplifiers. Deep racks (18–30 inches) are needed for servers and large-format video processors.
What is the difference between wall-mount and floor-standing rack dimensions?
Wall-mount racks typically range from 6U to 15U in height with depths of 6 to 18 inches and weight capacities of 50 to 150 lbs. They're designed for conference rooms and classrooms where floor space is limited. Floor-standing racks range from 18U to 45U in height with depths of 24 to 42 inches and weight capacities of 500 to 3000 lbs. They're used in equipment rooms, data centers, and broadcast facilities requiring greater capacity.
How much weight can an AV rack hold?
Weight capacity varies by rack type and construction. Wall-mount racks typically support 50 to 150 lbs (23–68 kg), limited by wall anchors and mounting brackets. Floor-standing racks support 500 to 3000 lbs (227–1361 kg) depending on frame construction and leveling feet. Always calculate total equipment weight including devices, cables, and accessories, and ensure the rack's capacity exceeds this by at least 20%.
What are common AV rack dimension mistakes?
Common mistakes include: (1) Ignoring rack depth and only considering U-height, (2) Not measuring equipment depth with cables attached, (3) Failing to reserve space for ventilation between heat-generating devices, (4) Underestimating power distribution needs, (5) Not planning for cable management, (6) Placing heavy equipment at the top of the rack, and (7) Not leaving room for future expansion. These errors lead to equipment that doesn't fit, overheating, and costly rework.
Conclusion
Understanding Audio Visual (AV) rack dimensions—including width, depth, height, and rack units (U)—is a foundational competency for every AV system integrator, designer, and installation professional working in the audio-visual industry. These standardized measurements, governed by the EIA-310-D specification, create a universal framework that ensures equipment compatibility, simplifies procurement, enables accurate planning, and prevents costly installation errors that can derail project timelines and budgets.
The 19-inch rack width standard has stood the test of time for nearly a century, providing interoperability across thousands of manufacturers and millions of products used in commercial AV, broadcast, telecommunications, and data-center applications. This consistency allows designers to confidently select equipment from different vendors knowing that devices will mount correctly in the same enclosure. The rack unit (U) measurement system, where 1U equals 1.75 inches (44.45 mm), provides an equally important vertical framework that allows teams to calculate space requirements, create accurate rack elevation diagrams, and communicate equipment placement clearly across distributed project teams.
Rack depth is often the most overlooked dimension, yet it has the greatest impact on equipment fit, cable management, and ventilation. Shallow wall-mount racks in the 6 to 12-inch range serve compact installations where minimizing wall protrusion is critical, but they require careful equipment selection to ensure devices fit with adequate cable clearance. Medium-depth racks from 12 to 18 inches accommodate the majority of professional AV equipment and represent the sweet spot for most wall-mounted installations. Deep racks extending from 18 to 30 inches are typically floor-standing enclosures that support servers, large-format video processors, broadcast equipment, and extensive cable-management systems.
The choice between wall-mounted and floor-standing racks depends on multiple factors including available space, equipment quantity, total weight, installation environment, and future expansion needs. Wall-mount racks ranging from 6U to 15U excel in conference rooms, classrooms, and huddle spaces where floor space is limited and equipment needs to be elevated for security and accessibility. Floor-standing racks from 18U to 45U provide the capacity, depth, and weight support required for equipment rooms, data centers, broadcast facilities, and central AV control locations serving multiple spaces.