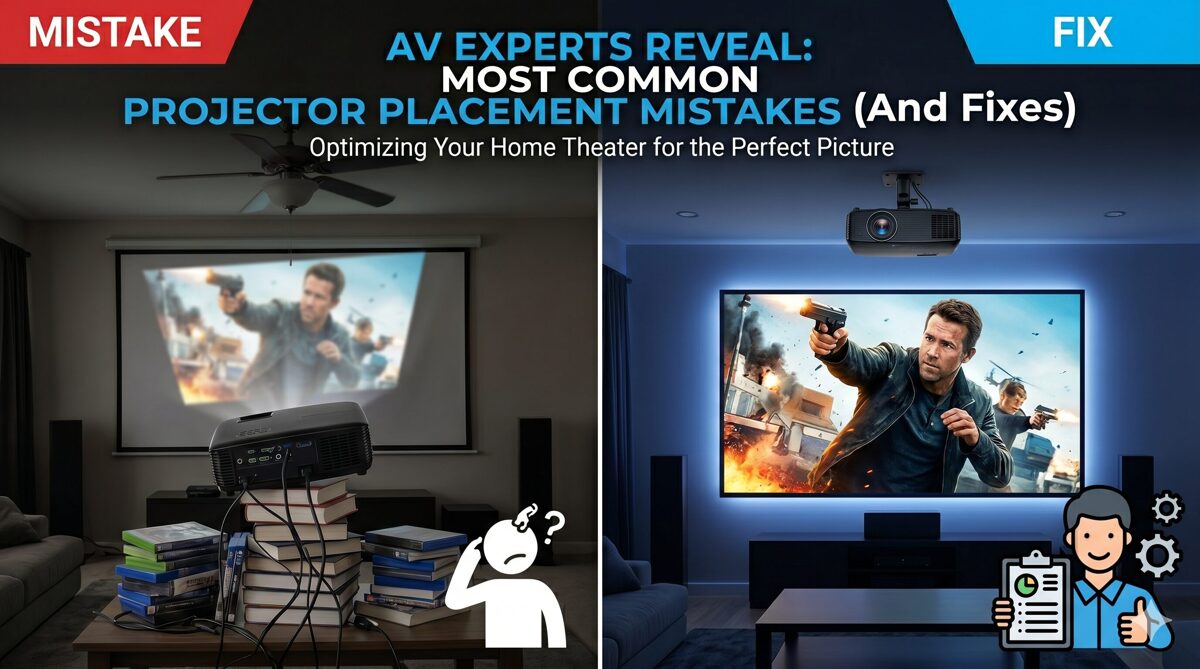
AV Experts Reveal the Most Common Projector Placement Mistakes (And Fixes)
Projector placement errors cost AV integrators thousands of dollars annually through installation rework, extended site visits, and diminished client satisfaction. Despite years of industry experience, even seasoned AV professionals occasionally miscalculate throw distances, misunderstand lens characteristics, or overlook critical environmental factors that compromise projection quality—including failing to address how to increase throw distance without sacrificing image quality. The difference between flawless projector installations and problematic deployments often lies in utilizing the right Projector Calculator Tool during the planning phase.
The importance of choosing the best Projector Calculator Tool cannot be overstated. Modern projection design requires precise mathematical calculations considering throw ratios, screen dimensions, mounting positions, lens shift capabilities, and ambient light conditions—along with strategies for optimizing setups, such as how to increase throw distance without sacrificing image quality. Manual calculations introduce human error, while inadequate planning tools fail to account for real-world variables that impact installation success. The right projector calculator transforms theoretical specifications into actionable installation parameters that ensure first-time-right deployments.
This comprehensive guide reveals the most common projector placement mistakes identified by AV experts across commercial installations, educational facilities, corporate environments, and home theater projects. We'll examine each error's root causes, practical consequences, and proven solutions—with a strong focus on how to increase throw distance without sacrificing image quality—while highlighting how advanced calculation tools prevent these issues before they occur.
Key Takeaways
Incorrect throw distance calculations represent the most frequent projector placement error, causing image size mismatches and focus problems
Inadequate lens shift planning forces keystone correction that degrades image quality and reduces brightness uniformity
Environmental factors including ambient light, ceiling height, and HVAC placement significantly impact projector performance
Modern projector calculator tools eliminate manual calculation errors and account for real-world installation variables
XTEN-AV's integrated approach combines precision calculations with 3D visualization and equipment recommendations
Ultra-short throw projectors require different planning considerations than standard throw or long throw models
Screen gain characteristics and surface materials directly influence required projector brightness and placement parameters
Professional calculation tools reduce site visits, accelerate project delivery, and improve installation profitability
Understanding the Critical Importance of Accurate Projector Placement
Projector placement determines fundamental aspects of viewing experience quality including image sharpness, brightness uniformity, geometric accuracy, and installation aesthetics. AV system integrators face increasing pressure to deliver perfect installations on accelerated timelines while managing tighter project budgets. Placement errors extend installation schedules, increase labor costs, and potentially require equipment changes that eliminate project profitability.
Client expectations have evolved significantly as projection technology advances. Corporate clients demand presentation spaces that support hybrid collaboration, while educational institutions require classroom projectors optimized for student engagement. Home theater enthusiasts expect cinema-quality experiences that rival commercial theaters. For practical implementation guidance, explore Case Study: Optimizing Classroom Projector Placement for Better Student Engagement, which demonstrates evidence-based approaches.
Industry data reveals that projector placement errors account for approximately 35% of installation callbacks and contribute to significant warranty claims related to perceived equipment defects that are actually installation issues. Proper planning tools dramatically reduce these problems while improving client satisfaction and referral rates.
Common Projector Placement Mistakes Revealed by AV Experts
Mistake #1: Incorrect Throw Distance Calculations
Throw distance errors represent the most common and consequential projector placement mistake. AV professionals sometimes rely on approximations, outdated specifications, or incorrect formulas when determining projector-to-screen distances, resulting in image sizes that don't match screen dimensions or client requirements.
The Root Cause
Throw distance miscalculations typically stem from confusion about throw ratio definitions, failure to account for zoom lens ranges, or misunderstanding manufacturer specifications. The fundamental formula Throw Distance = Throw Ratio × Image Width appears simple, but complexity emerges with zoom lenses, lens shift capabilities, and aspect ratio considerations.
Manual calculations introduce rounding errors and unit conversion mistakes—particularly when mixing metric and imperial measurements. AV designers working under time pressure may skip verification steps or rely on rough estimates that prove inadequate during physical installation.
Real-World Consequences
Incorrect throw distances force installers to reposition mounting hardware, adjust ceiling infrastructure, or in worst cases, specify different projector models with appropriate throw characteristics. Corporate clients lose conference room access during extended installation periods, while educational institutions face disrupted classroom schedules.
Image quality suffers when projectors operate at extreme zoom positions where optical performance degrades. Edge sharpness, brightness uniformity, and color accuracy all diminish when zoom lenses work outside optimal ranges.
The Professional Solution
Modern projector throw calculators eliminate these errors through automated calculations using verified manufacturer specifications. A projector throw distance calculator accounts for zoom ranges, lens options, and screen formats simultaneously, providing installation teams with precise mounting positions.
XTEN-AV's calculation engine delivers ±1% placement accuracy by incorporating industry-standard formulas with real equipment specifications. The platform's multi-brand compatibility enables AV integrators to compare throw characteristics across different manufacturers without switching between vendor-specific tools.
Mistake #2: Ignoring Lens Shift Capabilities and Limitations
Lens shift misunderstandings cause AV professionals to position projectors incorrectly relative to screen centers, forcing reliance on keystone correction that compromises image quality. Lens shift enables optical image repositioning without geometric distortion, but many designers either overlook this capability or misunderstand its operational limits.
Understanding Lens Shift vs. Keystone Correction
Optical lens shift maintains native resolution and rectangular geometry by physically moving lens elements to reposition the projected image. Keystone correction digitally manipulates the image, reducing effective resolution and introducing brightness variations that degrade viewing experience.
Vertical lens shift typically offers ±50-100% image height adjustment, while horizontal lens shift provides ±10-25% image width adjustment. These capabilities vary significantly between projector models, and installation plans must account for specific equipment specifications.
Common Planning Errors
AV designers frequently position projectors beyond lens shift ranges, assuming keystone correction will compensate. This approach sacrifices image quality unnecessarily. Conversely, some installations place projectors at screen center when lens shift could enable more aesthetically pleasing off-center mounting that avoids sightline obstructions.
Rear projection applications particularly suffer from lens shift confusion where mirror systems and throw distance constraints complicate geometry planning. For comprehensive technical comparison, examine Lens Shift vs Keystone: Which Preserves Focus Better?, which analyzes optical quality tradeoffs.
Best Practice Recommendations
Professional installation planning should maximize optical lens shift utilization while completely avoiding digital keystone correction whenever possible. Projector calculator tools must incorporate lens shift specifications when recommending mounting positions.
XTEN-AV's advanced modeling includes lens shift visualization showing permissible mounting positions that maintain optical image quality. The platform highlights when proposed projector locations would require keystone correction, enabling designers to adjust mounting plans before installation begins.
Mistake #3: Overlooking Screen Size and Aspect Ratio Compatibility
Screen sizing errors create mismatched image proportions where projected images either overflow screen boundaries or leave visible unused screen areas. Aspect ratio confusion between 16:9 widescreen, 16:10 presentation format, and 4:3 legacy standards causes frequent planning mistakes.
The Planning Challenge
Modern projection environments may require supporting multiple content formats from different source devices. Corporate presentations often use 16:10 laptops, while video content originates in 16:9 format. Educational spaces may need compatibility with legacy 4:3 materials alongside modern widescreen content.
Projector native resolutions don't always match desired screen dimensions, and AV designers must calculate appropriate image scaling and positioning parameters. Zoom capabilities provide some flexibility, but installation planning requires precise screen dimension specifications.
Resolution and Scaling Considerations
Native resolution mismatches between source content and projector specifications impact image sharpness and text readability. 1080p projectors displaying 4K content involve downscaling, while 4K projectors showing 1080p sources require upscaling that affects perceived quality.
For residential applications requiring precise calculations, consult How to Calculate Projector Screen Size for Home Theater, which provides detailed methodologies for optimizing home cinema dimensions.
Calculation Best Practices
Projector screen size calculators should account for viewing distance recommendations, screen gain characteristics, and audience geometry when specifying optimal dimensions. SMPTE standards suggest screen heights between 1/6 and 1/3 of viewing distances for comfortable long-duration viewing.
XTEN-AV's calculation engine automatically suggests appropriate screen sizes based on room dimensions, seating arrangements, and application requirements. The platform warns when aspect ratio mismatches would create letterboxing or pillarboxing that reduces effective screen utilization.
Mistake #4: Inadequate Ambient Light Analysis
Ambient light assessment failures result in washed-out images, poor contrast ratios, and unsatisfactory viewing experiences despite technically correct projector placement. AV professionals sometimes focus exclusively on geometric calculations while neglecting environmental lighting conditions that fundamentally impact projection visibility.
Environmental Light Sources
Natural daylight through windows, overhead lighting, emergency egress lighting, and reflected light from adjacent spaces all contribute to ambient illumination that competes with projected images. Light levels vary throughout the day and across seasons, particularly in spaces with exterior windows.
Modern LED lighting systems with high color temperatures prove especially problematic for projection quality compared to legacy incandescent sources. Smart lighting integration enabling automated dimming during projection sessions improves viewing conditions significantly.
Brightness Requirements
Projector brightness specifications measured in lumens must exceed ambient light levels by substantial margins to maintain acceptable contrast ratios. Industry guidelines recommend minimum 2:1 contrast ratios, though 5:1 or greater delivers superior viewing experiences.
Screen gain characteristics multiply effective brightness but narrow optimal viewing angles. High-gain screens (1.3-2.5) concentrate light toward central seating positions while reducing off-axis brightness. Unity-gain screens (1.0) provide wider viewing angles with lower brightness amplification.
To optimize brightness calculations for specific environments, reference Projector Screen Brightness Calculator: Improve Brightness, Resolution & Viewing Experience, which provides environment-specific recommendations.
Planning Solutions
Comprehensive ambient light analysis should occur during site surveys using light meters at various times reflecting typical usage patterns. Light control strategies including blackout shades, dimmable lighting, and architectural light control should inform projector specification alongside geometric calculations.
XTEN-AV's environmental modeling incorporates ambient lighting conditions when recommending projector brightness levels and screen specifications. The platform calculates required lumen output based on measured room conditions rather than theoretical minimums.
Mistake #5: Neglecting Projector Cooling and HVAC Considerations
Thermal planning oversights cause premature projector failures, excessive fan noise, and dust accumulation that degrades optical performance. Mounting positions that satisfy geometric requirements may create unacceptable thermal environments or expose projectors to HVAC airflow that disrupts cooling systems.
Thermal Management Requirements
High-brightness projectors generate substantial heat requiring adequate ventilation clearances. Manufacturer specifications define minimum clearance distances around intake vents and exhaust ports, but installation environments may restrict airflow beyond these basic requirements.
Enclosed soffit installations concentrate heat when ventilation proves inadequate. Summer ceiling temperatures in non-conditioned spaces can exceed projector operational limits, causing thermal shutdowns during critical presentations.
HVAC Interaction Problems
Direct HVAC airflow across projector cooling intakes disrupts designed thermal management, forcing fans to work harder and introducing dust and contaminants into optical paths. Ceiling-mounted diffusers positioned near projectors create problematic airflow patterns.
Temperature fluctuations from HVAC cycling cause optical element expansion and contraction affecting focus stability. Condensation risks emerge when cold supply air contacts warm projector surfaces in high-humidity environments.
Best Practice Thermal Planning
Site surveys must document HVAC register locations, airflow patterns, and ambient temperature ranges that affect projector mounting decisions. Thermal analysis should consider maximum summer temperatures and minimum winter conditions in seasonal climate zones.
Installation specifications may require HVAC modifications, supplemental ventilation, or projector enclosures with controlled airflow. Cable management must avoid blocking ventilation paths or creating heat pockets near projector housings.
Mistake #6: Poor Cable Management Planning
Cable routing oversights create installation delays, aesthetic problems, and signal integrity issues that compromise system reliability. AV integrators focusing on projector positioning sometimes defer cable planning until installation day, discovering routing challenges that force mounting adjustments or require expensive architectural modifications.
Common Cable Planning Failures
Inadequate conduit sizing prevents cable pulling or limits future expansion capabilities. Excessive cable lengths create signal degradation for analog video signals and complicate cable management within equipment racks and plenum spaces.
Power cable routing mixed with signal cables without proper separation introduces electromagnetic interference affecting video quality. HDMI cable length limitations around 50 feet without active extension or fiber optics constrain projector placement options in large spaces.
Infrastructure Requirements
Ceiling access limitations in finished spaces require planning cable paths that avoid structural obstacles while meeting building codes. Fire-rated assemblies demand proper plenum-rated cables and firestopping at penetrations that add installation complexity and cost.
Maintenance access to cable connections at projector locations requires planning service loops and connection accessibility for future troubleshooting. Permanent installations benefit from pull boxes and access panels that facilitate maintenance without ceiling removal.
For hands-on implementation guidance, explore DIY Projector Placement Setup Using a Calculator Tool (Beginner to Pro), which covers practical cable routing strategies.
Professional Solutions
Cable planning should occur during preliminary design using building drawings that show structural elements, HVAC ductwork, and existing infrastructure. 3D modeling tools help visualize cable routing and identify conflicts before construction begins.
XTEN-AV's integrated approach includes cable routing visualization within 3D room models, enabling designers to plan conduit paths and verify access clearances during design development. The platform calculates required cable lengths including service loops for accurate material estimates.
XTEN-AV: The Ultimate Projector Calculator Tool for AV Companies
XTEN-AV emerges as the comprehensive Projector Calculator Tool specifically engineered for AV system integrators, consultants, and design professionals seeking an end-to-end solution that transcends simple throw distance calculations. Unlike standalone calculators or manufacturer-specific tools, XTEN-AV provides an integrated design ecosystem where projector planning connects seamlessly with documentation, proposals, and complete AV system design.
Professional AV integrators require more than basic projection math—they need comprehensive planning tools that account for real-world installation variables, support multi-manufacturer environments, and integrate into business workflows from initial consultation through project closeout. XTEN-AV delivers this unified platform while maintaining the calculation precision essential for successful installations.
The platform's cloud-based architecture enables collaborative design workflows where distributed teams work simultaneously on complex commercial projects. Remote access capabilities allow field technicians to reference current design documents during installation activities, ensuring built conditions match design intent.
Key Features That Make XTEN-AV Projector Calculator Tool Stand Out
1. Accurate Throw Distance & Screen Size Calculations
XTEN-AV's calculation engine is built around precise projection mathematics, eliminating guesswork and manual formula applications:
Calculates throw distance, image dimensions, and throw ratios instantly using verified industry formulas
Uses standard calculations like Throw Distance = Throw Ratio × Image Width with proper lens factor adjustments
Delivers ±1% placement accuracy ensuring reliable first-time installations without trial-and-error adjustments
Accounts for zoom ranges showing minimum and maximum throw distances for flexible mounting
This calculation precision ensures perfect projector positioning without expensive on-site adjustments or reinstallation requirements. Engineering teams gain confidence that design specifications translate directly into successful physical installations.
2. Multi-Brand Compatibility (Not Vendor-Locked)
Unlike proprietary tools from manufacturers like Epson, Panasonic, Sony, or BenQ, XTEN-AV operates as hardware-agnostic platform:
Works with any projector model regardless of manufacturer or technology (LCD, DLP, LCoS, laser)
Ideal for integrators working across multiple equipment brands and supporting diverse client preferences
Eliminates dependency on manufacturer-specific tools requiring separate logins and incompatible workflows
Unified interface for comparing projection characteristics across competing products
This represents a major advantage for AV consultants handling diverse project portfolios requiring flexibility in equipment selection and competitive bidding scenarios. Multi-brand support accelerates design development when evaluating alternative projector specifications.
3. Advanced Room & Environment Modeling
The projector calculator transcends basic mathematics by incorporating real-world environmental variables:
Room dimensions and architectural layouts including ceiling heights, seating arrangements, and viewing angles
Screen gain and surface type characteristics affecting brightness distribution and viewing geometry
Ambient lighting conditions from natural daylight, artificial lighting, and reflected sources
Lens shift and optical correction capabilities determining acceptable mounting positions
This environmental modeling ensures real-world installation accuracy rather than purely theoretical calculations that ignore physical constraints. Design teams identify potential problems during planning phases rather than discovering issues during installation activities.
4. Automated Calculations (Zero Manual Work)
Traditional projector planning involves tedious manual formula application and repeated trial-and-error testing—XTEN-AV eliminates this inefficiency:
Instant calculation results by entering basic room parameters and equipment specifications
No manual calculations required—the platform handles all mathematical operations automatically
Reduces human error from unit conversions, rounding mistakes, and formula misapplication
Real-time updates when any input parameter changes during design refinement
Faster planning translates directly into faster project execution and improved team productivity. Junior designers produce accurate calculations without extensive technical training or engineering supervision.
5. Supports All Projector Types
XTEN-AV handles every projection scenario seamlessly across different throw classifications:
Short throw projectors with throw ratios below 1.0:1 for small meeting spaces and classrooms
Standard throw models with ratios between 1.2:1 and 2.0:1 for typical commercial installations
Long throw projectors exceeding 2.0:1 for auditoriums, theaters, and large venues
Ultra-short throw (UST) systems with ratios under 0.4:1 for interactive applications and space-constrained environments
Front projection and rear projection configurations with appropriate geometry adjustments
This comprehensive support makes the platform suitable for home theaters, corporate conference rooms, educational classrooms, worship facilities, auditoriums, and specialized applications. For bedroom-specific implementations, review How to Set Up a Projector in Your Bedroom for the Ultimate Movie Night.
6. Interactive & Dynamic Input Controls
The tool prioritizes usability and design flexibility through intuitive interface elements:
Slider-based adjustments enabling quick scenario testing without repeated data entry
Real-time recalculation when any input value changes, showing immediate design impacts
Easy experimentation with different equipment options, mounting positions, and screen sizes
Visual feedback indicating when parameters exceed recommended ranges or create installation challenges
Interactive controls help designers optimize projection setups in minutes rather than hours, facilitating rapid client consultations and design iteration. What-if analysis explores alternative approaches without committing to specific equipment selections.
7. 3D Visualization & Layout Simulation
XTEN-AV transcends traditional calculators with powerful visual planning capabilities:
View projector placement within 3D room simulations showing spatial relationships and mounting contexts
Check sightlines, projection angles, and physical obstructions that impact installation feasibility
Preview final setup before physical installation begins, reducing surprises during construction phases
Generate renderings for client presentations showing proposed AV configurations
3D visualization reduces installation errors by identifying clearance problems, accessibility issues, and aesthetic concerns during design development. Clients gain clearer understanding of proposed system layouts through visual presentations rather than abstract technical drawings.
8. Integrated AV Workflow (Not Just a Calculator)
This represents XTEN-AV's most significant differentiator from standalone tools:
Works inside complete AV design ecosystem rather than isolated calculation utility
Integrates with CAD drawings, equipment schedules, proposals, and technical documentation
Enables end-to-end project planning from initial concepts through installation documentation
Single platform for projection design, audio system planning, control integration, and infrastructure coordination
The projector calculator isn't a standalone tool—it's a core component of a full AV design platform that manages entire project lifecycles. Data flows seamlessly between calculation modules, drawing tools, and documentation systems without manual transfers or format conversions.
9. Real Product Database & Lens Intelligence
XTEN-AV uses actual manufacturer specifications rather than generic estimates:
Accurate lens specifications including zoom ranges, shift capabilities, throw ratios, and optical characteristics
Matches projectors to room constraints automatically by filtering equipment databases for compatible models
Prevents incorrect assumptions in planning by using verified product data rather than theoretical specifications
Regular database updates maintaining currency with new product releases and discontinued models
Equipment-level precision ensures design specifications accurately reflect available products rather than idealized performance. Procurement teams receive accurate part numbers and specifications directly from design documentation.
10. Environment-Aware Projector Recommendations
Beyond pure calculations, the platform assists decision-making processes:
Suggests ideal projector brightness levels based on measured or estimated ambient light conditions
Adapts recommendations to lighting control capabilities, screen characteristics, and viewing requirements
Improves final image quality outcomes by considering comprehensive environmental factors
Compares alternative equipment options showing performance tradeoffs and cost implications
This intelligent assistance bridges the gap between theoretical calculations and actual performance outcomes in real-world environments. Less experienced designers benefit from expert guidance embedded within the calculation workflow.
11. Massive Time Savings for AV Professionals
Operational efficiency improvements deliver direct business benefits:
Reduces planning time from hours to minutes for typical projection installations
Minimizes site visits by identifying installation challenges during design phases
Speeds up proposals and client approvals through faster design development and professional presentations
Improves project margins by reducing engineering overhead and installation callbacks
Increases project capacity enabling teams to handle more concurrent projects without additional headcount
Time savings translate into direct profitability improvements and competitive advantages in bid scenarios. Faster turnaround improves client satisfaction and generates referral business.
For hands-on DIY applications, explore How to Build a DIY Projector Setup for Your Bedroom, which applies these professional principles to residential projects.

Comparison: Manual Calculations vs. Professional Projector Calculator Tools
Aspect | Manual Calculations | Professional Tools (XTEN-AV) |
Calculation Speed | 15-30 minutes per scenario | Under 60 seconds per scenario |
Accuracy | ±5-10% with human error risk | ±1% verified accuracy |
Multi-Brand Support | Requires separate vendor tools | Unified interface for all brands |
Environment Modeling | Manual consideration required | Automated environmental analysis |
Lens Shift Planning | Manual specification lookup | Integrated shift visualization |
3D Visualization | Not available | Full 3D room modeling |
Documentation Integration | Manual transfer to drawings | Automatic synchronization |
Collaboration | File sharing and version conflicts | Real-time cloud collaboration |
Learning Curve | Requires training in formulas | Intuitive interface, minimal training |
Cost | Engineering time @ $75-150/hour | Subscription-based platform access |
Professional tools deliver 10-20x efficiency improvements for complex commercial projects involving multiple projection systems or challenging environments. ROI calculations consistently favor integrated platforms that eliminate redundant workflows and reduce engineering overhead. |
How AI is Transforming Projector Design in 2026
Artificial intelligence reshapes projection system design by analyzing complex multi-variable scenarios faster and more comprehensively than traditional methods. Machine learning algorithms trained on thousands of successful installations now provide design recommendations that incorporate industry best practices while avoiding common placement pitfalls.
AI-powered optimization examines room geometry, viewing requirements, equipment specifications, and budget constraints simultaneously to suggest optimal projector selections and mounting positions. Predictive analytics identify potential installation challenges including sightline obstructions, thermal issues, and cable routing complications during planning phases.
Natural language interfaces enable designers to interact with projection planning tools using conversational queries rather than technical parameter entry. Voice-activated design allows hands-free calculation updates during client meetings or site surveys, improving workflow efficiency and presentation impact.
Automated compliance checking leverages AI to verify projection designs against industry standards, accessibility requirements, and manufacturer recommendations. Intelligent assistants suggest corrective actions when design parameters violate best practices or create installation risks.
Generative design algorithms explore multiple layout alternatives automatically, evaluating each option against performance criteria, cost targets, and aesthetic preferences. Designers review AI-generated options and select optimal solutions rather than manually developing each alternative configuration.
Common Projector Type Selection Mistakes
Ultra-Short Throw Misconceptions
Ultra-short throw (UST) projectors offer compelling advantages for space-constrained environments but introduce unique planning considerations often overlooked by AV professionals unfamiliar with these systems:
UST projectors require extremely precise mounting positions—even small placement errors of 1-2 inches cause significant geometry problems. Wall flatness and screen mounting precision become critical success factors where traditional ceiling-mounted projectors tolerate greater installation tolerances.
Ambient light rejection (ALR) screens prove essential for UST deployments in environments with ambient lighting, but these specialized surfaces cost substantially more than standard projection screens. Budget planning must account for premium screen requirements.
Long Throw Applications
Auditoriums and large venues requiring long throw distances beyond 40-50 feet introduce lens selection complexities not present in typical commercial installations. Zoom lens ranges may prove insufficient, requiring interchangeable lenses or fixed long-throw optics.
Image brightness decreases proportionally with throw distance following inverse square law—doubling projection distance requires quadrupling lumen output to maintain equivalent screen brightness. High-brightness projectors exceeding 10,000 lumens become necessary for large-venue applications.
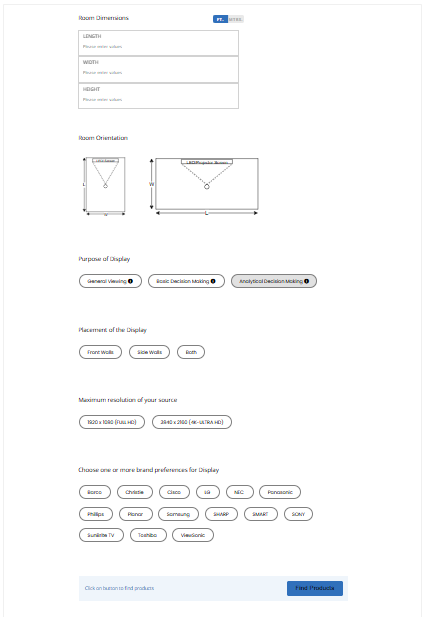
Projector Calculation Workflows: Step-by-Step Process
Initial Requirements Gathering
Professional projection design begins with comprehensive requirements documentation:
Measure room dimensions including length, width, and ceiling height
Document viewing distances from screen to furthest seating positions
Assess ambient lighting at different times matching typical usage patterns
Identify mounting constraints from structural elements, HVAC systems, and architectural features
Determine content types and aspect ratio requirements for source materials
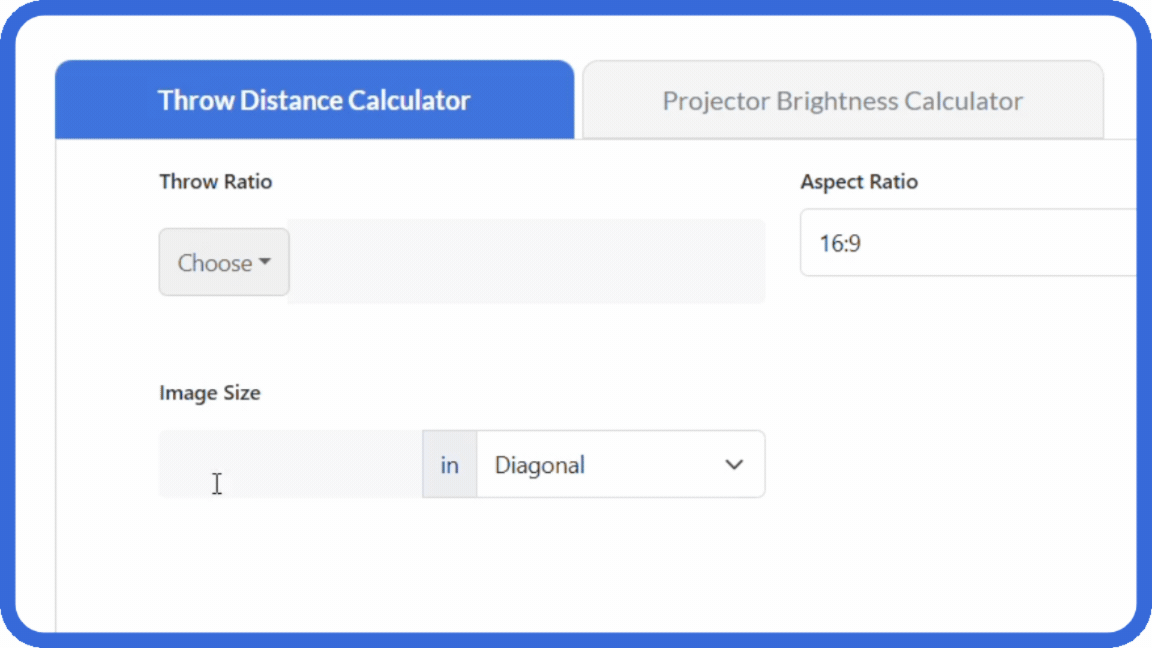
Using a Projector Throw Calculator
Projector throw calculators require specific inputs to generate accurate recommendations:
Screen Size Determination: Use a projector screen size calculator to identify optimal viewing dimensions based on audience geometry and viewing distance guidelines. SMPTE standards provide baseline recommendations, but application-specific requirements may justify deviations.
Throw Ratio Selection: Choose projector throw ratios appropriate for available mounting distances. A projector throw ratio calculator helps evaluate whether short throw, standard throw, or long throw models suit the installation environment.
Distance Calculation: Apply the projector throw distance calculator to determine exact projector positioning for desired screen sizes. Account for zoom ranges that provide mounting flexibility within specified distance constraints.
Verification and Optimization
Design validation requires checking calculations against manufacturer specifications and verifying installation feasibility:
Confirm lens shift ranges accommodate proposed mounting positions
Verify brightness requirements considering ambient light and screen gain
Check clearances for ventilation, service access, and cable routing
Validate power availability at planned projector locations
Frequently Asked Questions About Projector Placement
What is the most important factor in projector placement planning?
Accurate throw distance calculation represents the most critical factor in projector placement planning. Incorrect throw distances cause image size mismatches, focus problems, and may require complete reinstallation. Professional projector calculators eliminate these errors by precisely calculating mounting positions based on verified equipment specifications and room geometry. Secondary considerations including lens shift capabilities, ambient lighting, and thermal management build upon this foundational calculation.
How do I calculate the correct projector throw distance for my installation?
Throw distance calculation uses the formula: Throw Distance = Throw Ratio × Screen Width. First, determine desired screen width based on viewing distances and room dimensions. Then identify your projector's throw ratio from manufacturer specifications—typically ranging from 0.3:1 for ultra-short throw models to 3.0:1+ for long throw projectors. Multiply these values to find required mounting distance. Professional projector throw calculators automate this process while accounting for zoom ranges, lens shift, and installation tolerances.
Can I use keystone correction instead of proper projector positioning?
Keystone correction should be avoided whenever possible as it digitally manipulates the projected image, reducing effective resolution and introducing brightness variations. Optical lens shift maintains native image quality while repositioning the projection. Proper projector placement utilizing lens shift capabilities delivers superior image quality compared to keystone-corrected installations. Reserve keystone correction only for temporary setups or situations where mounting constraints prevent optimal positioning.
What projector brightness do I need for a room with windows?
Projector brightness requirements depend on ambient light levels and screen size. As a baseline, spaces with ambient light require minimum 2,500-3,500 lumens for screens around 100-120 inches diagonal. Rooms with uncontrolled natural daylight may demand 5,000-10,000 lumens or more. Light control strategies including blackout shades dramatically reduce brightness requirements. Use a projector screen brightness calculator that considers measured ambient light levels, screen gain, and desired viewing quality for accurate recommendations.
How far should a projector be from the screen?
Optimal projector distance varies based on throw ratio and screen size. Standard throw projectors (1.5:1 ratio) require approximately 12-15 feet for a 100-inch screen, while short throw models (0.5:1) need only 4-5 feet. Ultra-short throw projectors can be placed within 6-12 inches from the screen surface. Zoom lenses provide flexibility within specified ranges—for example, a 1.5:1 to 2.0:1 zoom lens allows mounting distances between 12-16 feet for the same screen size. Always verify manufacturer specifications for precise throw distance ranges.
What's the difference between throw ratio and throw distance?
Throw ratio represents the relationship between projection distance and image width, expressed as a ratio (e.g., 1.5:1). This specification describes projector lens characteristics independent of specific screen sizes. Throw distance measures the actual physical distance from projector lens to screen surface, typically measured in feet or meters. Throw distance equals throw ratio multiplied by screen width. Understanding this distinction helps AV professionals select appropriate projector models for specific installation environments.
Do I need a professional projector calculator tool for residential installations?
While simpler than commercial projects, residential home theater installations still benefit significantly from professional projector calculators. Home cinema optimization requires precise viewing distance calculations, screen sizing, and projector positioning to achieve cinema-quality experiences. DIY enthusiasts using quality calculation tools achieve results comparable to professional installations while avoiding costly placement mistakes that require remounting or equipment changes. XTEN-AV and similar platforms provide both professional features and accessible interfaces suitable for residential applications.
Best Practices Checklist for Avoiding Projector Placement Mistakes
Pre-Installation Planning
✅ Conduct comprehensive site survey documenting room dimensions, ceiling heights, and structural constraints
✅ Measure ambient light levels at various times reflecting typical usage patterns
✅ Identify HVAC locations and airflow patterns affecting thermal management
✅ Document power availability and circuit capacity at proposed projector locations
✅ Verify ceiling structure and mounting surface integrity for load-bearing capacity
✅ Plan cable routing paths considering conduit requirements and access limitations
Calculation and Design
✅ Use professional projector calculator rather than manual formulas to eliminate human error
✅ Calculate throw distances accounting for zoom ranges and mounting flexibility
✅ Maximize lens shift utilization to avoid keystone correction requirements
✅ Verify screen size compatibility with room dimensions and viewing distances
✅ Calculate required brightness based on ambient lighting conditions and screen gain
✅ Check all specifications against manufacturer datasheets for accuracy
Installation Verification
✅ Test mount positioning before permanent installation using temporary supports
✅ Verify image geometry and focus uniformity across entire screen area
✅ Check ventilation clearances and airflow patterns around projector housing
✅ Confirm cable connections and signal integrity for all source devices
✅ Document final as-built positions for maintenance records and future reference
✅ Provide client training on operation, maintenance, and troubleshooting
Conclusion: Eliminating Projector Placement Mistakes Through Intelligent Planning
Projector placement errors remain preventable through disciplined application of modern calculation tools and systematic planning methodologies. The common mistakes revealed by AV experts—incorrect throw distances, lens shift oversights, ambient light misunderstandings, and inadequate environmental analysis—all stem from insufficient planning rigor rather than technical complexity.
Professional-grade projector calculators like XTEN-AV transform theoretical projection specifications into actionable installation parameters while accounting for real-world variables that impact deployment success. Integrated platforms combining precision calculations, 3D visualization, environmental modeling, and end-to-end workflow support deliver the comprehensive design tools modern AV integrators require.
The investment in professional calculation tools and systematic design processes pays immediate dividends through reduced installation callbacks, eliminated rework costs, and improved client satisfaction. As projection technology advances and client expectations escalate, the AV professionals who embrace intelligent planning tools position themselves for sustained competitive advantage and operational excellence.
Whether designing complex commercial installations, optimizing educational environments, or creating exceptional home theater experiences, the foundation of success remains consistent—accurate planning using appropriate calculation tools that prevent placement mistakes before they occur. The question isn't whether to invest in professional projector calculators, but which platform best aligns with your organization's requirements and growth objectives.