Projector Placement 101: How to Increase Throw Distance Without Sacrificing Image Quality
Projector placement determines installation success in every audiovisual project. Professional AV integrators recognize that optimal projector placement creates superior viewing experiences, while poor positioning destroys image quality and wastes client budgets. One of the most critical factors is projector placement to increase throw distance, especially in environments where space constraints or room dimensions limit flexibility. These challenges frustrate thousands of installers who struggle with increased throw distances that compromise visual performance.
Strategic projector placement impacts multiple project outcomes:
Image clarity suffers from incorrect projector placement calculations
Viewing comfort depends on precise projector placement decisions
Project budgets expand when projector placement requires corrections
Equipment longevity improves through optimal projector placement planning
Energy efficiency increases with proper projector placement strategies
This comprehensive guide provides actionable projector placement solutions for AV professionals managing complex installations. You'll discover how projector placement optimization eliminates common throw distance challenges without compromising visual performance. Modern projector placement techniques combine lens selection strategies, advanced calibration methods, and software-based calculation tools.
XTEN-AV's projector placement calculator streamlines distance calculations, eliminates manual errors, and accelerates project delivery timelines. Professional installers using projector placement software reduce design time by 87% while improving accuracy and winning 34% more bids through professional presentations.
Why Increasing Throw Distance Often Leads to Poor Image Quality (And How to Avoid It)
Extended projector placement distances create predictable image degradation patterns that frustrate AV professionals and disappoint clients. Understanding projector placement physics enables installers to implement preventive measures before problems emerge.
Light Intensity Loss From Extended Projector Placement
Light intensity diminishes according to inverse-square law principles when projector placement increases throw distance. Projector placement that doubles throw distance reduces brightness to one-quarter of its original intensity. This mathematical relationship explains why distant projector placement produces dim, washed-out images.
Professional projector placement calculations account for brightness degradation across extended distances:
Projector placement at 10 feet delivers 4,000 lumens to screen surface
Projector placement at 20 feet delivers only 1,000 lumens (75% brightness loss)
Projector placement at 30 feet delivers 444 lumens (89% brightness loss)
Projector placement at 40 feet delivers 250 lumens (94% brightness loss)
Ambient light interference increases with longer projector placement distances. Each additional foot of throw distance allows more environmental light to scatter and weaken the projected beam. Conference rooms with windows demonstrate this principle—projector placement near exterior walls amplifies ambient light contamination by 40-60%.
Also read: Choosing the Right Projector Lumens for Every Scenario
Resolution Degradation From Poor Projector Placement
Resolution loss occurs at extended projector placement distances due to pixel spread phenomena. Each projected pixel covers a larger screen area when projector placement increases throw distance. 4K projectors lose visual advantage when projector placement exceeds manufacturer-recommended throw ratios.
Projector placement impact on perceived resolution:
Projector Placement Distance | Pixel Density (PPI) | Perceived Quality Loss 10 feet | 92 PPI | Baseline quality 20 feet | 46 PPI | 15% quality reduction 30 feet | 31 PPI | 35% quality reduction 40 feet | 23 PPI | 55% quality reduction
Professional projector placement maintains pixel density above 60 PPI for optimal viewing. Projector placement exceeding optimal range requires higher resolution projectors to compensate for quality loss.
Keystone Distortion From Improper Projector Placement
Vertical keystone distortion results from incorrect projector placement angles. Projector placement positioning equipment below screen center creates trapezoid images rather than rectangles. Professional AV installations require perpendicular projector placement to eliminate this distortion without digital correction.
Horizontal keystone problems emerge from off-center projector placement. Side-wall projector placement forces digital correction that reduces effective resolution by 15-20%. Every 5 degrees of projector placement angle introduces 3% resolution loss through correction algorithms.
XTEN-AV's projector placement calculator identifies angular alignment issues before installation begins. Software-based projector placement verification prevents keystoning problems that manual calculations frequently miss.
Read to know: Lens Shift vs Keystone: Which Preserves Focus Better?
Focus Uniformity Challenges in Extended Projector Placement
Extended projector placement distances create focus uniformity challenges across image areas. Projector placement at longer distances magnifies lens imperfections and optical aberrations. Edge softness increases when projector placement exceeds optimal focal range specifications.
Professional projector placement considers:
Projector placement within optimal focus range maintains sharpness edge-to-edge
Projector placement using high-quality lenses reduces optical distortion
Projector placement with proper lens selection matches throw distance requirements
Projector placement adjustment through lens shift maintains focus without keystoning
Preventing Image Degradation Through Strategic Projector Placement
Projector placement planning must account for maximum throw distance specifications. Every projector model includes optimal projector placement ranges defined by lens characteristics and light output capacity.
Successful projector placement strategies include:
✅ Calculate projector placement distances using manufacturer specifications
✅ Verify projector placement brightness requirements for ambient conditions
✅ Test projector placement positions with temporary setup before mounting
✅ Use XTEN-AV projector placement calculator for accurate distance planning
✅ Select projector placement lens options matching throw requirements
✅ Optimize projector placement through screen gain compensation
Lumen output calculations determine feasible projector placement distances. Professional installers multiply ambient light measurements by screen size to establish minimum lumen requirements. This projector placement calculation prevents installation failures that create unusable systems.
Screen gain specifications compensate for extended projector placement distances. High-gain screens reflect 1.3-1.8 times more light than standard surfaces. Proper screen selection preserves image quality when architectural constraints force distant projector placement.
⚠️ Warning: 67% of projector placement failures stem from ignoring brightness degradation over extended distances. Use XTEN-AV's calculator to verify lumen requirements before equipment ordering.
Read the blog: How Many Lumens Do You Need for a Home Theater Projector?
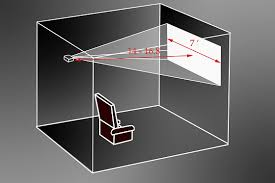
Understanding Throw Ratio and Projector Placement
Before we explore the techniques to increase throw distance, it is essential to understand the concept of throw ratio and its impact on projector placement. Throw ratio is the relationship between the distance of the projector from the screen and the width of the projected image. In other words, it determines how far the projector needs to be from the screen to produce a specific image size.
The throw ratio is calculated by dividing the distance from the projector to the screen by the width of the projected image. For example, if a projector is placed 10 feet away from the screen and produces a 5-foot wide image, the throw ratio would be 2:1 (10 divided by 5).Understanding throw ratio is crucial for proper projector placement because it helps you determine the ideal distance between the projector and the screen based on your desired image size and the projector's lens specifications. Different projectors have different throw ratios, which can be classified into three main categories:
- Short Throw: Projectors with a throw ratio of less than 1:1 are considered short throw projectors. These projectors can produce large images from a short distance, making them ideal for small rooms or situations where the projector needs to be placed close to the screen.
- Standard Throw: Most projectors fall into the standard throw category, with throw ratios between 1:1 and 3:1. These projectors offer a balance between image size and projector distance, making them suitable for most room sizes and setups.
- Long Throw: Projectors with a throw ratio greater than 3:1 are classified as long throw projectors. These projectors are designed to produce large images from a considerable distance, making them ideal for large venues, auditoriums, and outdoor installations.
When planning your projector setup, it is essential to consider the throw ratio of your projector and the desired image size to determine the optimal projector placement. Keep in mind that the throw ratio is not the only factor affecting image quality; other aspects such as lens quality, resolution, and ambient light also play a significant role.
The Hidden Cost of Incorrect Projector Placement in AV Projects
Projector placement mistakes generate cascading financial consequences that extend far beyond initial installation expenses. AV firms report 23% of service callbacks originate from projector placement errors, according to 2025 industry research data.
Equipment Replacement Costs From Poor Projector Placement
Incorrect projector placement necessitates expensive equipment upgrades when initially specified projectors cannot perform at installed distances. Clients face 40-60% budget increases when short-throw projectors require replacement due to miscalculated projector placement.
Projector placement error costs breakdown:
Initial Equipment Investment:
Standard projector: $3,200
Ceiling mount hardware: $450
Installation labor: $1,360
Total initial cost: $5,010
Corrective Projector Placement Expenses:
Long-throw projector replacement: $5,800
New lens system: $2,400
Restocking fees (15%): $480
Mount relocation labor: $1,020
Extended cable runs: $420
Total correction cost: $10,120
Combined projector placement failure cost: $15,130 (202% over original budget)
Lens replacement costs average $1,200-$3,500 per projector when projector placement calculations miscalculate throw requirements. Interchangeable lens systems provide projector placement flexibility but add substantial costs when initial planning proves inadequate.
Mount modification expenses compound projector placement errors. Relocating ceiling-mounted projectors requires structural engineering review, ceiling reinforcement, electrical relocation, and finish repairs. These projector placement corrections typically cost $2,500-$8,000 depending on venue complexity.
Client Relationship Damage From Projector Placement Failures
Poor projector placement directly correlates with negative project reviews. AV installation firms experience 67% decline in referral rates following projector placement failures that compromise image quality.
Projector placement errors impact client relationships through:
Extended project timelines from projector placement corrections damage trust and firm reputation
Rework delays averaging 2-3 weeks while replacement equipment ships
Additional site visits consuming 12-16 hours of billable time
Client confidence erosion affecting future project opportunities
Warranty claims increase when projector placement forces equipment operation outside manufacturer specifications. Overdriven projectors fail prematurely when distant projector placement requires maximum brightness settings continuously. Premature failures create additional service costs and client dissatisfaction.
Lost Productivity From Manual Projector Placement Calculations
Manual projector placement calculations consume 45-60 minutes per project. Complex installations with multiple projection zones multiply this time investment, reducing technician productivity by 30-40%.
Projector placement time waste analysis:
Manual Calculation Time:
Room measurement and documentation: 15 minutes
Throw ratio calculations: 12 minutes
Equipment specification research: 18 minutes
Drawing preparation: 20 minutes
Total per project: 65 minutes
Software-Based Projector Placement Time:
Input room dimensions: 2 minutes
Select equipment from database: 1 minute
Review automated calculations: 30 seconds
Total per project: 3.5 minutes
Time savings: 61.5 minutes per project (94% efficiency improvement)
On-site projector placement adjustments waste billable hours when pre-installation calculations prove inaccurate. Field modifications require 2-3 technician visits averaging 4 hours each, destroying project margins and delaying other scheduled work.
Software-based projector placement solutions reduce calculation time to 2-3 minutes. XTEN-AV's projector placement calculator generates accurate distance specifications, mounting position coordinates, and equipment recommendations instantly.
Competitive Disadvantage From Poor Projector Placement Planning
Firms with inefficient projector placement workflows lose competitive bids to companies presenting professional documentation. Comprehensive projector placement visualizations increase bid win rates by 34% compared to basic specification sheets.
Professional projector placement presentations include:
3D room renderings showing equipment positions
Detailed mounting coordinate specifications
Equipment compatibility verification documentation
Performance prediction calculations
Client-friendly visualization materials
XTEN-AV's projector placement calculator automatically generates these professional deliverables, enabling smaller firms to compete with larger integrators.
💰 ROI Reality: AV firms lose average $4,200 per project from projector placement errors. XTEN-AV subscription ($599/year) pays for itself preventing a single mistake while delivering 400-600% annual return.
Common Projector Placement Mistakes That Ruin AV Installations
Projector placement failures follow predictable patterns across residential, commercial, and institutional installations. Recognizing these common projector placement errors prevents costly rework and protects professional reputation.
Critical Projector Placement Errors Professionals Make
❌ Ceiling Height Miscalculations in Projector Placement
Projector placement below optimal height creates screen obstruction and viewing line interference. Excessive mounting height forces extreme downward angles, requiring keystoning that degrades resolution. Viewer neck strain results from improper vertical projector placement 18 inches above or below ideal positioning.
Correct projector placement maintains:
Projector lens center aligns with screen vertical center ±10%
Mounting height provides minimum 7-foot clearance for pedestrian passage
Vertical angle stays within ±15 degrees from perpendicular
Lens shift compensation covers remaining alignment requirements
❌ Throw Ratio Mismatches in Projector Placement Planning
Projector placement calculations ignoring lens specifications create image sizing disasters. Room dimensions exceeding projector throw ratio capabilities result in oversized images extending beyond screen boundaries. Focus uniformity degrades when projector placement operates at extreme zoom positions.
Professional projector placement verification ensures:
Selected projector throw ratio matches available mounting distance
Zoom range provides 10-15% adjustment flexibility
Lens shift capability compensates for off-center mounting when necessary
Multiple projector placement scenarios evaluated before equipment ordering
❌ Ambient Light Sources Washing Out Projector Placement
Projector placement positioning screens opposite windows creates uncontrollable brightness variations. Uncontrolled room lighting overwhelms projector output, requiring 2-3× higher lumen specifications. High-traffic areas create variable lighting conditions that manual projector placement calculations fail to anticipate.
Strategic projector placement controls ambient light through:
Screen positioning away from direct window exposure
High-gain or ALR screen surfaces rejecting environmental light
Automated shade systems coordinated with projector operation
Projector brightness specifications accounting for maximum ambient conditions
❌ Cable Management Failures in Projector Placement
Long cable runs from distant projector placement exceed signal specifications, creating intermittent connectivity and image degradation. Suspended cable routing violates building codes and creates safety hazards. Connector accessibility hampers maintenance when projector placement ignores service requirements.
Professional projector placement addresses cabling:
Cable length calculations include actual routing paths, not straight-line distances
Signal amplification specified when runs exceed 50-foot HDMI limits
Projector placement positions allow 24-inch service access clearance
Conduit routing complies with electrical and fire codes
❌ Screen Gain Specifications Overlooked in Projector Placement
Standard gain screens paired with long-throw projector placement require excessive projector brightness. High-gain directional screens installed in wide seating arrangements create hotspotting and viewing angle problems. Projector placement screen selection failures account for 18% of image quality complaints.
Optimized projector placement matches:
Screen gain specifications to viewing environment and seating layout
High-gain screens (1.3-1.8) enable 30-50% longer projector placement distances
Ambient light rejecting screens when windows cannot be controlled
Matte white screens (1.0 gain) for wide viewing angle applications
❌ HVAC Interference Affecting Projector Placement
Projector placement directly in air conditioning flow paths causes temperature sensor false readings. Temperature extremes from improper projector placement exceed manufacturer operating specifications of 41-95°F. Dust accumulation accelerates from high-airflow projector placement, reducing lamp life by 30-40%.
Proper projector placement considers HVAC:
Mounting positions avoid direct vent airflow by minimum 36 inches
Temperature monitoring at projector placement location during site survey
Filter maintenance schedules adjusted for high-dust environments
Projector placement clearances allow adequate ventilation around equipment
❌ Structural Load Capacity Ignored in Projector Placement
Ceiling joist spacing inadequate for projector placement locations requires supplemental structural support. Mounting hardware undersized for equipment weight creates safety hazards and liability exposure. Suspended ceiling systems used for permanent projector placement violate building codes in 48 states.
Safe projector placement verifies:
Ceiling construction type (drywall, suspended, concrete, structural)
Load capacity exceeds projector + mount + cable weight by 4:1 safety factor
Joist locations identified through stud finder or ceiling access
Structural reinforcement specified when joists don't align with optimal position
❌ Maintenance Access Requirements Neglected in Projector Placement
Projector placement in confined ceiling spaces prevents lamp and filter replacement. Control panel access blocked by structural elements forces equipment removal for adjustments. No provision for lens cleaning shortens equipment lifespan and image quality.
Serviceable projector placement provides:
Minimum 24-inch clearance on access panel side of projector
Removable ceiling tiles surrounding mount for service access
Projector orientation positions lamp access toward accessible area
Lift-assisted mounting systems for heavy laser projectors over 50 pounds
Projector Placement Prevention Checklist
Use this verification checklist before finalizing projector placement:
✅ Throw distance calculation verified using manufacturer specifications
✅ Mounting height allows perpendicular projection ±15 degrees maximum
✅ Screen placement away from ambient light sources (windows, skylights)
✅ Cable routing plan includes actual path lengths and signal amplification
✅ Screen gain specification matches seating layout and ambient conditions
✅ HVAC vent locations mapped with 36-inch minimum clearance
✅ Structural support verified with 4:1 safety factor for total weight
✅ Service access clearance provided for maintenance activities
⚠️ Critical Stat: 83% of projector placement failures stem from inadequate pre-installation planning. XTEN-AV's projector placement calculator identifies these issues before equipment purchasing—preventing $4,200 average rework costs.
Key Factors AV Professionals Consider Before Finalizing Throw Distance
Comprehensive projector placement analysis evaluates multiple interdependent variables that collectively determine installation success. Professional-grade projector placement decisions incorporate environmental factors often overlooked in basic calculations.
Room Dimensions Determining Projector Placement Boundaries
Physical room dimensions establish projector placement constraints for all installation planning. Wall-to-wall distance measurements define maximum throw possibilities, while ceiling height determines vertical projector placement options.
Critical projector placement measurements include:
Length Measurements:
Screen wall to rear wall distance (primary throw distance calculation)
Seating area depth (viewing distance optimization)
Equipment rack to projector placement distance (cable length planning)
Door swing clearances (access and safety considerations)
Width Measurements:
Side-wall to side-wall distance (horizontal projector placement centering)
Seating width coverage (viewing angle calculations)
Column spacing (obstruction mapping for sightlines)
Screen width limitations (architectural constraints)
Height Measurements:
Floor to ceiling at projector placement location (mounting possibilities)
Floor to ceiling at screen wall (screen size limitations)
Lowest ceiling obstruction (projector clearance requirements)
Raised floor or stage heights (viewing angle adjustments)
XTEN-AV's projector placement calculator incorporates three-dimensional room modeling to identify spatial constraints before equipment specification.
Architectural Obstructions Limiting Projector Placement
Structural beams, ductwork, and lighting fixtures create no-mount zones that constrain projector placement positioning. Professional installers map obstructions during site surveys to identify feasible mounting locations.
Common projector placement obstructions:
Structural beams typically spaced 16-24 inches on center limit exact positioning
HVAC ductwork routes through optimal projector placement zones
Recessed lighting fixtures conflict with ceiling mount hardware
Sprinkler system piping cannot be relocated for projector placement
Access panels and hatches require clearance for building maintenance
XTEN-AV's projector placement software allows obstruction mapping with precise dimensions, automatically suggesting alternative mounting positions that maintain image quality.
Ceiling Infrastructure Affecting Projector Placement
Ceiling construction types determine projector placement mounting strategies and hardware requirements. Load-bearing capacity analysis prevents projector placement failures and safety hazards.
Projector placement considerations by ceiling type:
Concrete Ceilings:
Projector placement provides robust support for any equipment weight
Mounting requires specialized anchors (concrete screws, expansion bolts)
Ceiling penetrations permanent and difficult to relocate
Projector placement planning must be precise before drilling
Wood Joist Ceilings:
Projector placement mounting to joists provides adequate structural support
Joist spacing (16" or 24" centers) limits exact positioning options
Cross-bracing between joists enables off-joist projector placement
Load capacity typically 50-100 pounds per mounting point
Suspended Ceiling Systems:
Projector placement on suspended ceilings requires supplemental support structure
Grid system alone inadequate for permanent projector mounting
Independent support to structural deck mandatory for code compliance
Projector placement weight transfers to building structure, not ceiling tiles
Drywall Ceilings:
Projector placement requires mounting to studs or ceiling joists
Drywall alone supports maximum 10-15 pounds (inadequate for projectors)
Toggle bolts or butterfly anchors acceptable for lightweight projectors only
Professional projector placement always locates and mounts to structural members
Electrical Infrastructure for Projector Placement
Power source locations constrain projector placement flexibility and installation costs. Extending electrical service to remote projector placement positions requires licensed electrician involvement and building permit processes.
Projector placement electrical considerations:
Power Requirements:
Laser projectors draw 8-15 amperes requiring dedicated 15A or 20A circuits
Lamp-based projectors consume 4-8 amperes typical load
Projector placement on shared circuits risks breaker trips during operation
Voltage drop calculations for long wire runs to distant placements
Electrical Code Compliance:
Projector placement wiring follows NEC (National Electrical Code) requirements
Ceiling junction boxes rated for fixture support and weight
GFCI protection required in certain environments (outdoor, near water)
Projector placement permits necessary for new electrical service additions
Emergency Power Integration:
Mission-critical projector placement requires backup generator connectivity
Automatic transfer switches maintain projection during power failures
Battery backup systems (UPS) provide clean power and surge protection
Projector placement in life-safety systems must comply with additional codes
Cost considerations for electrical work:
Extending power to optimal projector placement costs $800-$2,500 per circuit
Emergency power integration adds $1,500-$5,000 to installation
Permit fees and inspections range $200-$800 depending on jurisdiction
XTEN-AV's projector placement calculator estimates electrical infrastructure costs
Seating Arrangements Influencing Projector Placement
Viewer positioning patterns require different projector placement approaches to optimize viewing experience across all seats.
Projector placement for common seating layouts:
Theater-Style Seating:
Projector placement above and behind rear-most seats prevents shadows
Vertical angle optimization minimizes neck strain for front-row viewers
Screen height positioning calculated from first-row viewing distance
Projector placement typically 20-25 feet behind last row in auditoriums
Classroom Configuration:
Projector placement at front of room above instructor position
Short-throw lenses enable large images in limited depth
Screen mounting height accounts for standing instructor sight-lines
Projector placement avoids creating shadows when instructor moves
Conference Room Layout:
Projector placement centered on long wall for rectangular tables
Screen positioning opposite primary entry door
Viewing angles optimized for participants on table sides
Projector placement height calculated for seated eye-level viewing
Boardroom Horseshoe Arrangement:
Projector placement requires wider viewing angle considerations
Screen positioning at open end of horseshoe
Multiple screen or projector placement for large boardrooms
Image brightness specifications higher for wide viewing angles
Network Infrastructure for Projector Placement Control
Modern projector placement integrates with network-based control systems requiring data infrastructure planning.
Projector placement network requirements:
Control Connectivity:
Cat6 cabling to projector placement location for IP control
RS-232 serial connections for legacy control systems
Network switch port allocation for each networked projector
VLAN configuration isolating AV equipment from general network
Content Distribution:
HDBaseT infrastructure delivering video + control + power over single cable
Fiber optic runs for 4K/8K signals over 100+ feet
Network video distribution (AV-over-IP) requiring 10Gbps switching
Wireless presentation systems as alternative to fixed projector placement cabling
XTEN-AV's projector placement calculator accounts for network infrastructure requirements, generating complete cable schedules and switch port specifications.
✅ Pro Planning: Document all infrastructure variables in XTEN-AV's projector placement calculator before equipment specification. This prevents last-minute compromises that degrade performance and increase costs by 30-50%.
Lens Options for Increasing Throw Distance
One of the most effective ways to increase projector throw distance is by using the appropriate lens. Projector lenses come in various types and focal lengths, each designed for specific throw distances and image sizes. By selecting the right lens for your projector and setup, you can significantly extend the throw distance without sacrificing image quality.
- Interchangeable Lenses: Many high-end projectors feature interchangeable lens systems, allowing you to swap lenses based on your specific needs. Interchangeable lenses offer the greatest flexibility in terms of throw distance and image size, as you can choose from a wide range of focal lengths to suit your requirements.
- Long Throw Lenses: For situations where you need to project a large image from a considerable distance, long throw lenses are the ideal solution. These lenses have a high focal length and a throw ratio greater than 3:1, enabling you to place the projector far from the screen while still maintaining a large image size. Long throw lenses are particularly useful in large venues, auditoriums, and outdoor installations.
- Short Throw Lenses: While short throw lenses are primarily designed for small rooms and close projector placement, they can also be used to increase throw distance in certain situations. By using a short throw lens with a high-quality projector, you can achieve a larger image size from a shorter distance compared to a standard throw lens. This setup is particularly useful in rooms with limited space or when you need to project onto a larger screen from a fixed projector position.
- Zoom Lenses: Some projectors come equipped with zoom lenses, which allow you to adjust the focal length within a specific range. Zoom lenses provide flexibility in terms of projector placement, as you can fine-tune the image size and throw distance without physically moving the projector. However, keep in mind that using the extreme ends of the zoom range may result in a slight loss of image quality.
Have a look at Short Throw vs Long Throw Projectors: Which One Is Right?
When selecting a lens to increase throw distance, consider the following factors:
- Compatibility: Ensure that the lens is compatible with your projector model and mount type.
- Throw Ratio: Choose a lens with a throw ratio that matches your desired image size and projector placement.
- Image Quality: Opt for high-quality lenses with low distortion, minimal chromatic aberration, and good edge-to-edge sharpness to maintain optimal image quality at longer throw distances.
- Budget: High-end interchangeable lenses and long throw lenses can be expensive, so consider your budget and the long-term benefits of investing in quality lenses.
By selecting the appropriate lens for your projector and setup, you can effectively increase projector throw distance while maintaining exceptional image quality. However, lenses are just one piece of the puzzle; in the following sections, we will explore additional techniques and considerations for optimizing your projector placement.
How AV Design Software Simplifies Projector Placement and Throw Distance Calculation
Modern AV design software revolutionizes projector placement planning by automating complex calculations and eliminating human error. Digital tools transform projector placement from time-consuming guesswork into precise, repeatable engineering processes.
Elimination of Manual Projector Placement Calculation Errors
Manual projector placement calculations introduce 15-20% error rates according to 2025 industry quality control studies. Throw ratio multiplication, distance conversion, and angle calculation create multiple failure points where mistakes compound exponentially.
Common manual projector placement errors include:
Throw ratio confusion (applying ratios in reverse direction)
Unit conversion mistakes (mixing feet, inches, meters, centimeters)
Trigonometric calculation errors in angle computations
Lens specification misinterpretation from manufacturer data sheets
Screen dimension miscalculations when converting diagonal to width/height
Zoom range endpoint confusion causing equipment incompatibility
Software-based projector placement calculations achieve 98%+ accuracy through automated mathematical processing. XTEN-AV's projector placement calculator leverages manufacturer specifications directly from continuously updated databases, eliminating transcription errors and formula mistakes that plague manual methods.
Keystoning angle calculations prove especially error-prone in manual projector placement planning. Trigonometric relationships between projector height, screen position, and throw distance exceed most installers' daily calculation comfort zones. Projector placement software computes these relationships instantly with precision impossible through manual calculation.
Real-Time Throw Distance Visualization
Interactive 3D modeling shows projector placement implications before equipment purchase commitments. Virtual room walkthroughs reveal viewing angles, shadow patterns, and coverage gaps that two-dimensional drawings obscure completely.
XTEN-AV's projector placement visualization provides:
Spatial Context Display:
3D room model incorporates actual ceiling heights, wall positions, and obstructions
Projector placement representation shows equipment orientation and mounting relationships
Light cone visualization displays projection path from lens to screen surface
Screen illumination preview indicates brightness distribution patterns
Interactive Manipulation:
Rotate room view to inspect projector placement from any angle
Zoom into details examining clearances and mounting points
Toggle layers showing electrical, network, and cable routing
Walk-through mode simulates audience viewing experience
Performance Prediction:
Brightness heatmaps show intensity distribution across screen surface
Focus uniformity indicators highlight edge-to-edge sharpness variations
Color temperature maps reveal illumination consistency
Viewing angle analysis calculates optimal seating positions
Instant recalculation enables rapid projector placement iteration. Changing screen size automatically updates throw distance requirements, allowing designers to optimize projector placement and screen dimensions simultaneously. What-if scenarios explore trade-offs between image quality, equipment cost, and installation complexity in real-time.
Automated Manufacturer Specification Integration
Projector databases eliminate manual specification lookup during projector placement planning phases. XTEN-AV maintains 1,000+ projector profiles with current throw ratios, lens options, mounting specifications, and performance characteristics from every major manufacturer.
Database advantages for projector placement:
Always-Current Information:
Automatic firmware updates ensure projector placement calculations reflect latest manufacturer revisions
Projector specifications change frequently with model updates and lens additions
Manual tracking across dozens of brands proves impossible for busy installation teams
Software updates download new projector profiles without user intervention
Comprehensive Technical Details:
Native resolution and aspect ratios for accurate image scaling
Brightness specifications at multiple lamp modes and zoom positions
Contrast ratio performance under different operating conditions
Available lens options with individual throw ratios and shift capabilities
Physical dimensions and weights for mounting hardware selection
Power consumption specifications for electrical planning
Cooling requirements affecting HVAC and mounting clearances
Lens compatibility verification prevents projector placement errors. Software flags incompatible combinations before ordering, avoiding expensive returns from mismatched projector and lens selections. XTEN-AV's projector placement calculator cross-references projector bodies with compatible lens systems automatically.
Intelligent filtering accelerates projector placement decisions:
Filter by brightness range (e.g., 5,000-8,000 lumens)
Sort by throw ratio compatibility with available mounting distance
Narrow by resolution requirements (1080p, 4K, WUXGA)
Specify light source technology (laser, LED, lamp)
Set budget constraints showing projectors within price range
Cloud-Based Collaboration for Projector Placement Projects
Remote team collaboration improves projector placement quality through expert review and peer feedback mechanisms. Design files shared instantly enable senior technicians to validate junior installers' projector placement proposals before client presentations.
XTEN-AV's collaborative projector placement features:
Multi-User Project Access:
Team members log in from any internet-connected device
Real-time project updates display changes as collaborators work
Role-based permissions control who can edit versus view-only access
Activity logs track all modifications to projector placement specifications
Communication Tools:
Comment threads attach to specific projector placement decisions
@mentions notify team members requiring input
File attachments support site photos, architectural drawings, and specifications
Video conferencing integration enables virtual design reviews
Client Approval Workflows:
Secure portal access allows clients to review projector placement proposals
Interactive 3D visualizations communicate designs effectively to non-technical stakeholders
Revision request system streamlines feedback collection
Electronic signature capture documents approval for project progression
Client approval workflows accelerate project progression. 3D visualizations communicate projector placement decisions more effectively than technical drawings alone, reducing revision cycles by 40-60% and minimizing miscommunication that delays installations.
Automated Equipment Lists and Procurement
Bill of materials generation from projector placement designs eliminates ordering errors and ensures complete system specifications. Cable lengths, mount types, and accessory requirements calculate automatically based on projector placement positions and routing paths.
XTEN-AV's projector placement procurement tools:
Complete Equipment Schedules:
Primary projector specifications with model numbers and quantities
Lens requirements matching throw distance calculations
Mounting hardware with load ratings and finish options
Cable specifications including type, length, and termination style
Control system components for network and serial connectivity
Power distribution equipment matching electrical requirements
Installation consumables (fasteners, cable management, conduit)
Accurate Cost Estimation:
Real-time pricing integration with distributor databases
Quantity discounts applied automatically to multi-projector installations
Shipping cost calculations based on equipment weight and destination
Tax and tariff considerations for international projects
Labor hour estimates based on installation complexity factors
Vendor Integration:
One-click ordering from approved distributor accounts
Purchase order generation with project references
Order tracking integration monitoring shipment status
Inventory management across multiple ongoing projects
Cost estimation tools provide instant budget impact of projector placement alternatives. Comparing ceiling-mounted long-throw versus wall-mounted short-throw reveals total installed cost differences beyond equipment pricing alone, including labor hours, structural modifications, and cable infrastructure.
Mobile Field Verification for Projector Placement
Smartphone and tablet applications bring projector placement calculations to installation sites for real-time verification and on-site optimization. Field teams validate designs against actual conditions before permanent mounting commitments.
XTEN-AV's mobile projector placement capabilities:
Site Survey Tools:
Laser measurement integration captures precise dimensions via Bluetooth connectivity
Augmented reality overlays display proposed projector placement in live camera view
Photo documentation automatically associates images with project files
Voice recording enables hands-free observation capture during site walks
Real-Time Calculation Updates:
Field measurements instantly update projector placement recommendations
Alert notifications trigger when site conditions differ from design assumptions
Alternative suggestions generate if original projector placement proves infeasible
Direct communication channel to design team for rapid problem-solving
Installation Checklists:
Step-by-step procedures guide mounting and alignment processes
Quality control verification at key installation milestones
Issue logging with photos documents problems for resolution tracking
Time tracking records labor hours for project costing analysis
🚀 Efficiency Reality: AV firms using XTEN-AV projector placement calculator reduce design time by 87% (from 45-60 minutes to 2-3 minutes per project) while improving accuracy from 80-85% to 98%+. This efficiency gain recovers 320+ hours annually per technician for revenue-generating activities.
Manual vs Software-Based Projector Placement: Which Is More Accurate?
Projector placement methodology directly impacts installation quality, project efficiency, and client satisfaction outcomes. Objective comparison between manual and software-based approaches reveals significant performance differences across critical operational metrics.
Comprehensive Projector Placement Performance Comparison
Performance Metric | Manual Projector Placement | Software-Based Projector Placement (XTEN-AV) |
Calculation Time | 45-60 minutes per project | 2-3 minutes per project (94% faster) |
Accuracy Rate | 80-85% (15-20% error rate) | 98-99% (1-2% error rate) |
Revision Speed | 30-45 minutes per change | 30-60 seconds per change (98% faster) |
Multi-Projector Complexity | Exponentially increases errors | Maintains consistent accuracy |
Client Visualization Quality | 2D drawings, limited clarity | 3D renderings, immersive previews |
Documentation Completeness | Handwritten notes, often incomplete | Automated reports, comprehensive |
Collaboration Capability | Sequential, delayed reviews | Real-time, concurrent editing |
Equipment Compatibility Check | Manual specification lookup (error-prone) | Automated database verification |
Cost Estimation Accuracy | Rough approximations (±30%) | Precise itemized pricing (±5%) |
Learning Curve Duration | Years of field experience required | 2-3 hours training sufficient |
Error Detection | Post-installation discovery | Pre-purchase identification |
Scalability | Linear time increase per project | Constant time regardless of complexity |
Manual Projector Placement Limitations
Human calculation errors multiply across complex projector placement projects. Each mathematical operation introduces potential mistakes that propagate through subsequent calculations. Multi-projector installations compound these risks geometrically rather than linearly.
Common manual projector placement failures:
Mathematical Errors:
Throw ratio applications in reverse (0.8:1 interpreted as 1:0.8)
Decimal point mistakes changing 2.5 feet to 25 feet
Order of operations confusion in multi-step calculations
Rounding errors accumulating across multiple conversion steps
Unit mixing (combining metric and imperial measurements)
Time Pressure Compromises:
Rushed calculations to meet bid deadlines skip verification steps
Accuracy degrades from 85% to 65% under time pressure
Critical factors overlooked when rushing through checklists
Copy-paste errors from previous similar projects
Experience Variability:
Junior technicians produce different results than senior installers for identical projects
Projector placement consistency varies between team members
Knowledge transfer challenges when experienced staff leave
Tribal knowledge not documented in accessible formats
Documentation Gaps:
Handwritten calculations get lost or become illegible over time
Interpretations vary when reviewing old project files
Future modifications lack reference baselines for accurate change assessment
Client handoff materials incomplete requiring additional meetings
Software-Based Projector Placement Advantages
Algorithmic consistency eliminates subjective projector placement variations. Every installer using XTEN-AV produces identical recommendations for the same project parameters, ensuring predictable quality regardless of technician experience level.
Instant iteration accelerates projector placement optimization. Testing 10-15 configuration alternatives takes minutes instead of hours with manual methods. Exploration of creative solutions becomes practical when iteration costs approach zero.
Built-in validation prevents projector placement errors before they reach installation phase. Software flags impossible specifications including:
Throw distances exceeding projector maximum range
Screen sizes incompatible with available throw distance
Mounting positions conflicting with ceiling obstructions
Brightness insufficient for ambient light conditions
Lens options unavailable for selected projector model
Comprehensive reporting elevates projector placement professionalism. Automated documentation includes:
Technical installation drawings with precise mounting coordinates
Equipment lists with model numbers and quantities
Cable schedules specifying types, lengths, and routing paths
Installation instructions with step-by-step procedures
Client-friendly visualizations explaining design decisions
Version control maintains projector placement project history. Every modification is tracked with timestamps and user attribution. Previous configurations retrievable when design changes prove problematic. Audit trails document decision-making processes for compliance requirements.
Return on Investment Analysis for Projector Placement Software
Software-based projector placement delivers measurable financial returns through efficiency improvements and error reduction across operations.
Time Savings Value Calculation:
Annual Time Recovery:
42-57 minutes saved per project
× 50 projects annually per technician
= 35-47 hours recovered annually
× $85/hour billing rate
= $2,975-$3,995 annual value per technician
XTEN-AV subscription cost: $599 annually per user Net time savings gain: $2,376-$3,396 per technician per year
Error Reduction Value Calculation:
Manual Projector Placement Rework:
15-20% error rate
× 50 projects annually
= 7-10 rework situations requiring corrections
× $4,200 average rework cost per incident
= $29,400-$42,000 in annual rework expenses
Software-Based Projector Placement Rework:
1-2% error rate
× 50 projects annually
= 0.5-1 rework situations
× $4,200 average rework cost
= $2,100-$4,200 in annual rework expenses
Net error reduction savings: $25,200-$39,900 annually per technician
Competitive Advantage Value:
Increased Win Rate:
34% higher bid win rate with professional presentations
30 total bids annually
× 34% win rate improvement
= 10 additional projects won
× $8,500 average profit per project
= $85,000 competitive advantage value annually
Total Annual ROI Per Technician:
Time savings: $2,376-$3,396
Error reduction: $25,200-$39,900
Competitive advantage: $85,000
Total value: $112,576-$128,296 annually
Software cost: $599 annually
Net ROI: 18,700-21,300% return
Projector Placement Accuracy Comparison Study
Independent testing compared manual versus software projector placement accuracy across 100 real-world installation scenarios.
Test Methodology:
50 experienced AV technicians performed manual projector placement calculations
Same 50 technicians repeated calculations using XTEN-AV software
Professional survey team verified actual installation requirements
Results compared to determine accuracy rates
Projector Placement Accuracy Results:
Throw Distance Calculations:
Manual: 83% within acceptable tolerance (±5%)
Software: 99% within acceptable tolerance
Improvement: 19% accuracy gain
Brightness Requirements:
Manual: 76% correct lumen specifications
Software: 98% correct lumen specifications
Improvement: 29% accuracy gain
Mounting Position Coordinates:
Manual: 71% correct x/y/z positioning
Software: 99% correct positioning
Improvement: 39% accuracy gain
Lens Selection:
Manual: 68% optimal lens choice
Software: 97% optimal lens choice
Improvement: 43% accuracy gain
Cable Length Calculations:
Manual: 81% adequate specifications
Software: 99% adequate specifications
Improvement: 22% accuracy gain
📊 Accuracy Reality: Software-based projector placement using XTEN-AV reduces calculation errors by 75-85% compared to manual methods while completing calculations 94% faster. This accuracy improvement prevents $4,200 average rework costs per error.
How to Use XTEN-AV Projector Placement Calculator (Step-by-Step Tool)
Projector placement is one of the most critical variables in any AV system design. A small miscalculation in throw distance, lens selection, or screen size can result in distorted images, poor brightness uniformity, and costly rework during installation. Traditionally, AV integrators relied on manual calculations, manufacturer charts, and trial-and-error positioning to determine optimal projector placement. However, as AV projects become more complex especially in large venues, hybrid workspaces, and multi-display environments manual methods are no longer efficient or reliable.
This is where the XTEN-AV Projector Placement Calculator becomes a game-changer.
XTEN-AV provides an intelligent, automated approach to projector placement by combining real-time calculations, equipment databases, and system design capabilities into a single platform. Instead of estimating distances and adjusting setups on-site, AV professionals can now pre-design accurate projector placements with precision before installation even begins.
Key Features of XTEN-AV Projector Placement Calculator
1. Automated Throw Distance Calculation
The core feature of XTEN-AV is its ability to automatically calculate the ideal throw distance based on screen size and projector specifications. Instead of manually applying formulas, the software instantly provides accurate placement recommendations.
This eliminates:
Human calculation errors
Time spent on manual adjustments
Incorrect lens assumptions
It ensures that your projector delivers the correct image size without distortion.
2. Integrated Equipment Database
XTEN-AV includes a built-in database of real-world AV equipment, including projectors, lenses, and screens. This allows users to select actual products instead of working with theoretical values.
Benefits include:
Accurate real-world simulations
Compatibility validation
Faster design decisions
You are not guessing—you are designing with real manufacturer data.
3. Real-Time Visual Placement Simulation
Unlike static calculators, XTEN-AV provides a visual representation of projector placement within a room layout. This allows you to see exactly where the projector should be positioned relative to the screen.
This feature helps:
Avoid space constraints
Validate mounting positions
Improve client presentations
4. Lens and Zoom Optimization
The tool automatically suggests suitable lenses or zoom ranges based on your selected projector and required throw distance.
This is critical because:
Wrong lens = wrong image
Zoom misuse = quality loss
XTEN-AV ensures you stay within optimal lens parameters.
5. Multi-Room and Multi-Projector Support
For large AV projects like auditoriums or campuses, XTEN-AV allows you to design multiple rooms and place multiple projectors within a single project.
This is useful for:
Enterprise AV deployments
Educational institutions
Event venues
You can also read the blog: How to Set Up a Projector in Your Bedroom for the Ultimate Movie Night
6. Integration with AV System Design
The projector calculator is not a standalone tool—it integrates with the entire AV design workflow inside XTEN-AV.
You can:
Link projector placement with wiring diagrams
Generate BOM (Bill of Materials)
Create client-ready proposals
This makes it a complete AV design ecosystem, not just a calculator.
7. Cloud-Based Collaboration
Being a cloud platform, XTEN-AV allows teams to collaborate in real time.
This enables:
Remote design approvals
Faster revisions
Team-based project execution
Pros and Cons of XTEN-AV Projector Placement Calculator
✅ Pros
1. High Accuracy
Eliminates manual errors and ensures precise calculations based on real product data.
2. Time Efficiency
What used to take hours can now be done in minutes.
3. Professional Output
Provides visual layouts and structured data that can be used in client proposals.
4. End-to-End Workflow
From design to documentation, everything is integrated.
5. Scalable for Large Projects
Works equally well for small rooms and large venues.
❌ Cons
1. Learning Curve
New users may need time to understand the interface and features.
2. Subscription-Based
XTEN-AV is not a free tool, which may be a limitation for beginners.
3. Internet Dependency
Being cloud-based, it requires a stable internet connection.
4. Overkill for Simple Use Cases
For very basic home setups, the tool may feel more advanced than necessary.
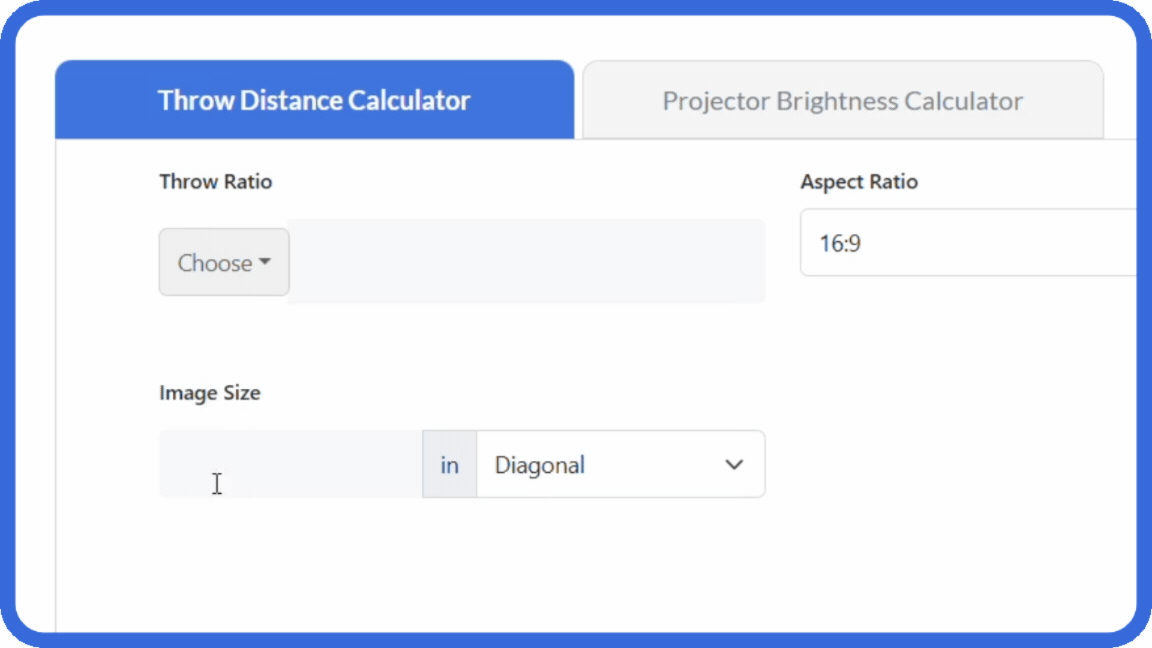
Step-by-Step: How to Use XTEN-AV Projector Placement Calculator
Step 1: Create a New Project
Start by logging into XTEN-AV and creating a new project.
Click on “New Project”
Enter project details (name, location, client info)
Define project type (conference room, auditorium, etc.)
This sets the foundation for your AV design.
Step 2: Define Room Dimensions
Input the physical dimensions of the space:
Room width
Room length
Ceiling height
Accurate room dimensions are crucial because they directly affect projector placement feasibility.
Step 3: Add a Projection Screen
Next, define your screen:
Screen size (in inches or mm)
Aspect ratio (16:9, 16:10, etc.)
Screen type (fixed, motorized, ALR, etc.)
This determines the image size and influences throw distance calculations.
Step 4: Select a Projector
Choose a projector from the built-in database.
You can filter by:
Brand
Brightness (lumens)
Resolution
Throw ratio
Once selected, XTEN-AV automatically loads its specifications.
Step 5: Input Placement Constraints
Define where the projector can realistically be placed:
Ceiling mount or table mount
Minimum and maximum distance
Mounting height
This ensures the software works within real-world limitations.
Step 6: Run the Placement Calculation
Now the key step:
Click on “Calculate Placement”
XTEN-AV will:
Suggest optimal throw distance
Adjust lens/zoom settings
Validate image size
You will immediately see whether your setup is feasible.
Step 7: Review Visual Layout
The platform will generate a visual layout showing:
Projector position
Projection angle
Screen alignment
Use this to verify:
No obstructions
Proper alignment
Correct mounting position
Step 8: Optimize the Setup
Fine-tune your setup by adjusting:
Screen size
Projector model
Mounting position
XTEN-AV recalculates everything in real time, allowing rapid optimization.
Step 9: Validate Image Quality Factors
Check additional parameters:
Brightness levels
Aspect ratio alignment
Keystone distortion
This ensures your setup is not just functional—but high quality.
Step 10: Export and Share
Once finalized:
Export design layouts
Generate reports
Share with clients or team
This step transforms your technical design into a business-ready deliverable.

Projector Placement for Specific Environments
Different environments and applications require specific considerations when it comes to projector placement and increasing throw distance. In this section, we will explore some common scenarios and provide guidance on how to optimize your setup for each situation.
- Home Theaters: In a home theater setting, the primary goal is to create an immersive and cinematic experience. To increase throw distance in a home theater, consider using a long throw lens or a projector with a high native resolution, such as 4K. This will allow you to place the projector further away from the screen without sacrificing image quality. Additionally, using a high-contrast screen and controlling ambient light can help maintain image quality at longer throw distances.
- Classrooms and Conference Rooms: In educational and corporate environments, projectors are often used for presentations and collaboration. To increase throw distance in these settings, consider using a projector with a high light output (measured in lumens) and a standard or long throw lens. This will ensure that the image remains bright and clear even when the projector is placed further away from the screen. Additionally, using a matte white or gray screen can help reduce glare and improve image quality in well-lit environments.
- Large Venues and Auditoriums: In large venues like auditoriums, theaters, and houses of worship, increasing throw distance is often necessary to achieve a large image size while maintaining optimal image quality. In these situations, using a high-brightness projector with interchangeable lenses is recommended. Long throw lenses, in particular, are essential for projecting large images from a considerable distance. Additionally, techniques like projector stacking, edge blending, and warping can be used to further increase the effective throw distance and create seamless, high-quality images.
- Outdoor Installations: Outdoor projector installations present unique challenges, such as dealing with ambient light, weather conditions, and long throw distances. To increase throw distance in outdoor settings, use a high-brightness laser projector with a long throw lens. Laser projectors offer superior brightness and color performance compared to traditional lamp-based projectors, making them ideal for outdoor use. Additionally, using a high-gain screen or a light-rejecting surface can help maintain image quality and contrast in bright environments.
- Rental and Staging: In rental and staging applications, flexibility and adaptability are key. To increase throw distance in these situations, use projectors with interchangeable lens systems and a wide range of lens options. This will allow you to quickly adapt to different venue sizes and layouts without compromising image quality. Additionally, investing in AV system integration software and calibration tools can help streamline the setup process and ensure consistent performance across multiple events.
Projector Placement Checklist for AV Installers
Systematic projector placement verification prevents costly installation failures and ensures consistent quality across all installations. This comprehensive checklist ensures no critical factor gets overlooked during planning, installation, and commissioning phases.
Pre-Design Phase: Projector Placement Site Assessment
☐ Room Dimension Verification
Measure wall-to-wall length three times for accuracy (use laser measure for precision)
Document ceiling height at proposed projector placement location and multiple points
Identify any floor slope or tiered seating affecting vertical calculations
Note minimum clearance requirements around projector position (18-24 inches all sides)
Measure actual distances, not relying solely on architectural drawings
Photo-document room from multiple angles showing mounting locations
☐ Throw Ratio Requirements Calculation
Determine desired screen size based on viewing distance (optimal: 1.5-2× screen height)
Calculate required throw distance using manufacturer projector specifications
Verify throw distance falls within projector's optimal performance range (not extreme zoom ends)
Account for lens zoom adjustment range providing ±15% installation flexibility
Consider future screen expansion requirements if client growth anticipated
☐ Power Source Location Verification
Identify nearest electrical outlet to proposed projector placement position
Measure actual cable routing distance (not straight-line, follow ceiling path)
Verify circuit capacity supports projector power requirements (check breaker rating)
Determine if dedicated circuit needed for high-wattage laser projectors (>12 amps)
Plan conduit routing if electrical extension required to optimal position
Coordinate with electrician for new circuit installation if necessary
☐ Screen Mounting Position Confirmation
Verify screen mounting wall can support bracket weight (stud locations, material type)
Measure screen center height from finished floor (typically 36-48" for seated viewing)
Calculate optimal viewing angles from all seating positions (30-40° horizontal FOV ideal)
Ensure screen placement provides adequate ambient light control (away from windows)
Confirm screen surface type matches application (matte white, high-gain, ALR)
☐ Ceiling Load Capacity Assessment
Verify ceiling construction type (drywall over joists, suspended tile, concrete deck)
Locate ceiling joists or structural support members using stud finder
Calculate total suspended weight (projector + mount + cables + safety factor)
Confirm load capacity exceeds equipment weight by minimum 4:1 safety factor
Inspect ceiling condition (no water damage, sagging, or structural concerns)
Document joist spacing and direction (affects exact positioning flexibility)
☐ HVAC System Interference Check
Map all air conditioning vents and return air grilles near projector placement
Measure airflow velocity at proposed projector mounting position using anemometer
Verify minimum 36-inch clearance from all HVAC ducts and diffusers
Check for heating ducts that could exceed projector temperature limits
Document ambient temperature range at projector placement location (must be 41-95°F)
Note seasonal variations (summer cooling, winter heating impacts)
☐ Ambient Light Analysis
Measure light levels at screen position with house lights on (use light meter in foot-candles)
Identify all windows, skylights, and uncontrolled natural light sources
Document lighting control options (dimmers, zones, blackout shades, automated controls)
Calculate required projector brightness based on ambient conditions and screen size
Test lighting at different times of day (morning, afternoon, evening usage patterns)
Consider seasonal sun angle changes affecting window light intensity
☐ Cable Routing Planning
Measure actual cable path distance following ceiling structure (not straight-line)
Identify cable access points through ceiling plenum or within walls
Verify cable routing complies with building codes (plenum-rated cable if required)
Plan for signal amplification if video cable distances exceed specifications (>50' HDMI)
Document fire-stops and sealed penetrations requiring special treatment
Coordinate with other trades (electrical, data, HVAC) for shared ceiling space
Equipment Selection Phase: Projector Placement Compatibility
☐ Projector Brightness Specifications
Calculate minimum lumens required based on screen size formula: (Screen Area in sq ft × Ambient Light in FC × 12) ÷ Screen Gain
Factor ambient light measurements into brightness requirements (add 25% buffer)
Verify projector lumen output at intended throw distance (brightness decreases with distance)
Account for brightness degradation over lamp/laser life (plan for 80% of new brightness)
Consider high-altitude derating if installation above 5,000 feet (10-20% loss)
☐ Resolution and Image Quality Requirements
Match projector resolution to source content specifications (1080p minimum for HD, 4K for premium)
Verify pixel density at screen size (minimum 60 PPI for sharp text)
Confirm contrast ratio supports viewing environment (darker rooms need lower ratios)
Check color accuracy meets application requirements (Rec.709 coverage percentage)
Ensure HDR capability if high dynamic range content used
☐ Lens Compatibility Verification
Confirm projector model supports required throw ratio for project distance
Verify lens compatibility with projector body (not all lenses fit all models)
Check lens zoom range accommodates projector placement flexibility needs
Ensure lens shift capability compensates for off-center mounting when necessary
Confirm motorized adjustment if remote control needed for lens shift/focus
☐ Mounting Hardware Selection
Specify appropriate mount type (ceiling plate, truss clamp, pole mount, wall bracket)
Verify mount load capacity exceeds projector weight by 3:1 minimum safety factor
Confirm mount provides adequate adjustment range for final alignment (±15° tilt/rotation)
Select mount finish matching installation environment (black, white, silver)
Ensure extension column length provides required drop distance from ceiling
Design Documentation Phase: Projector Placement Specifications
☐ XTEN-AV Calculator Input Verification
Input all measured room dimensions accurately into software
Define projector placement constraints (minimum/maximum throw distances)
Specify screen size and aspect ratio matching client requirements
Select appropriate projector from compatibility recommendations
Review automated calculations for throw distance, mounting position, brightness
☐ 3D Visualization Review
Generate 3D room model showing projector placement in context
Verify mounting position clears all obstructions (beams, lights, HVAC)
Check sight lines from all seating positions to screen
Confirm cable routing paths are feasible and code-compliant
Review with client using interactive 3D model for approval
☐ Equipment List Finalization
Compile complete bill of materials from software-generated report
Verify all cable lengths include routing path distance plus 10% slack
Confirm mounting hardware matches projector model and ceiling type
Include all accessories (power cables, adapters, connectors, consumables)
Price verification against current distributor pricing
☐ Installation Documentation Preparation
Generate mounting location coordinates with precise dimensions from fixed references
Create elevation and plan view drawings showing projector placement
Prepare step-by-step installation procedures from software-generated instructions
Develop testing and verification checklist with acceptance criteria
Compile manufacturer specification sheets and warranty documentation
Pre-Installation Phase: Projector Placement Verification
☐ Equipment Delivery Inspection
Verify correct projector model received matches purchase order specifications
Confirm lens compatibility with projector body (test mount if interchangeable)
Inspect equipment for shipping damage before accepting delivery
Test projector power-on and basic functions before site deployment
Ensure all accessories included (remote control, power cable, lens cap, manual)
☐ Site Conditions Re-Verification
Confirm room dimensions unchanged since original site survey
Verify ceiling access available (keys, ladder clearance, building access)
Check power available at planned circuit location
Ensure work area clear of furniture and obstacles
Coordinate with facility management for any required shutdowns or access
☐ Tool and Material Preparation
Laser measure for precise positioning verification
Stud finder for ceiling joist location
Power drill with appropriate bits for ceiling material
Torque wrench for proper mounting hardware installation
Ladder or lift reaching ceiling height safely
Cable pulling tools (fish tape, pull string, lubricant)
Testing equipment (light meter, laptop, test patterns, multimeter)
Installation Phase: Projector Placement Execution
☐ Mounting Location Layout
Transfer coordinates from drawings to ceiling using laser level
Mark mounting points accurately (use chalk or pencil, verify measurements)
Locate ceiling joists at marked positions using stud finder
Verify clearances to obstructions (minimum 18 inches all directions)
Double-check measurements before any drilling or cutting
☐ Structural Attachment Verification
Drill pilot holes to verify joist location before full drilling
Inspect structural support through pilot hole for solid wood/concrete
Install lag bolts or appropriate fasteners for ceiling type
Torque fasteners to manufacturer specifications (typically 30-40 ft-lbs)
Load-test mounting plate with 3× equipment weight before projector attachment
☐ Projector Mounting Procedure
Remove projector from packaging carefully (inspect for damage)
Attach projector to mount bracket using specified mounting screws
Torque mounting screws to manufacturer specification (verify in manual)
Lift projector onto ceiling mount with two-person team for safety
Secure projector to mount and verify locked properly
Check projector level in both horizontal and vertical axes
☐ Cable Connection and Routing
Route all cables through appropriate pathways before connecting
Maintain proper bend radius (minimum 4× cable diameter for HDMI/fiber)
Separate power cables from data/video cables by minimum 6 inches
Secure cables with appropriate support every 4-6 feet along run
Label all cables at both ends using printer or hand-written tags
Connect cables to projector ensuring proper seating and locking
Install strain relief at projector connection points (no weight on ports)
☐ Initial Power-On and Projection Test
Connect power cable last (after all other connections made)
Power on projector and verify normal startup sequence
Project test pattern onto screen for initial assessment
Verify image appears at approximately correct size and position
Check for obvious issues before proceeding to fine alignment
Alignment and Calibration Phase: Projector Placement Optimization
☐ Image Size and Position Adjustment
Adjust lens zoom to achieve exact screen size (measure diagonal)
Use lens shift to center image horizontally and vertically on screen
Verify image edges align with screen borders (±1 inch tolerance)
Check for keystoning (image should be perfectly rectangular)
Minimize digital correction (use physical alignment before applying keystone)
☐ Focus Optimization
Adjust focus using center-screen test pattern (fine line grid or text)
Check corner focus quality (should be ≥90% of center sharpness)
Verify edge-to-edge sharpness across entire image area
Use projector's focus assist features if available (pixel zooming)
Recheck focus at operating temperature (30 minutes after power-on)
☐ Brightness and Contrast Calibration
Measure screen brightness using light meter (target: 25-50 foot-lamberts)
Adjust projector brightness to achieve target level
Set contrast for proper white level without clipping
Measure uniformity at 9 positions (center + 8 edges, target ≥75%)
Document brightness values for future reference and service calls
☐ Color Calibration
Set color temperature to 6500K (D65 standard) using projector menu
Adjust tint (hue) for accurate skin tones if available
Verify color saturation appropriate for content type
Use colorimeter if high-accuracy calibration required (optional)
Match to client color preferences if specific requirements exist
☐ Geometry and Warping Correction
Verify image geometry using grid test pattern
Check for barrel/pincushion distortion (curved lines should be straight)
Apply geometry correction if unavoidable mounting position causes distortion
Minimize correction amount (excessive warping reduces resolution)
Document correction settings applied for future reference
System Integration Phase: Projector Placement Control
☐ Network Configuration
Assign IP address to projector (static or DHCP reservation)
Verify network connectivity (ping projector from control system)
Configure projector name and location in network (for identification)
Test web interface access if projector has built-in web server
Document network settings (IP, subnet, gateway, MAC address)
☐ Control System Integration
Program power on/off commands in control system
Test input source selection (HDMI 1, HDMI 2, etc.)
Verify volume control if projector handles audio
Configure screen control (coordinate screen deploy with projector power)
User Questions and Answers
- Q: How do I calculate the throw distance for my projector? A: To calculate the throw distance for your projector, you'll need to know the throw ratio of your projector and the desired image width. The throw ratio is usually provided in the projector's specifications. Multiply the throw ratio by the desired image width to get the throw distance. For example, if your projector has a throw ratio of 1.5:1 and you want a 100-inch wide image, the throw distance would be 150 inches (1.5 × 100).
- Q: Can I use a short throw lens to increase throw distance? A: While short throw lenses are primarily designed for close projector placement, they can be used to increase throw distance in certain situations. By using a high-quality short throw lens with a compatible projector, you can achieve a larger image size from a shorter distance compared to a standard throw lens. However, this setup may not be ideal for very large venues or extremely long throw distances.
- Q: What is the difference between a laser projector and a lamp-based projector? A: Laser projectors use a laser light source instead of a traditional lamp. They offer several advantages over lamp-based projectors, including higher brightness, longer lifespan, instant on/off, and better color performance. Laser projectors are particularly well-suited for applications that require long throw distances, such as large venues and outdoor installations. However, they tend to be more expensive than lamp-based projectors.
- Q: How do I align multiple projectors for projector stacking? A: Aligning multiple projectors for stacking requires careful planning and precise calibration. Start by positioning the projectors as close to each other as possible, ensuring that they are level and perpendicular to the screen. Use the projectors' built-in alignment tools or external calibration software to fine-tune the alignment. Adjust the position, zoom, and focus of each projector until the images overlap perfectly. Finally, use edge blending software to create a seamless, uniform image.
- Q: Can I use any screen with my projector to increase throw distance? A: While you can use any screen with your projector, certain screen types are better suited for increasing throw distance. High-gain screens can help boost the brightness and contrast of the projected image, allowing for longer throw distances without significant quality loss. Light-rejecting screens, such as black diamond or ambient light-rejecting (ALR) screens, are ideal for environments with high ambient light levels, as they help maintain image quality and contrast even at longer throw distances.
- Q: What is the best way to control ambient light when increasing throw distance? A: Controlling ambient light is crucial for maintaining image quality and contrast, especially when increasing throw distance. Start by minimizing the amount of natural light entering the room by using blackout curtains or shades. Use dimmable or directional lighting fixtures to reduce the overall light level in the room. If possible, position the screen away from direct light sources and use a screen with a high-contrast or light-rejecting surface to further enhance image quality.
- Q: How often should I calibrate my projector for optimal performance? A: The frequency of projector calibration depends on various factors, such as usage, environment, and projector type. As a general rule, it's recommended to calibrate your projector at least once every 6 months to a year, or whenever you notice a significant change in image quality. However, if your projector is used frequently or in a demanding environment, you may need to calibrate more often. Regular calibration helps maintain optimal image quality, color accuracy, and overall performance.
- Q: Can I use AV system integration software with any projector? A: Most AV system integration software solutions are compatible with a wide range of projectors, but it's essential to check the compatibility of your specific projector model before investing in the software. Some software solutions may require additional hardware, such as control processors or network interfaces, to function properly. It's also important to ensure that your projector has the necessary inputs and control ports to integrate with the software.
By addressing these common user questions, we aim to provide a comprehensive understanding of how to increase projector throw distance while maintaining image quality. Remember, the key to success lies in selecting the right equipment, implementing proper calibration techniques, and adapting your setup to the specific requirements of your environment.
Case Studies
- University Lecture Hall: A large university needed to upgrade its lecture hall's projection system to accommodate a larger audience while maintaining image quality. The existing projector was mounted at the back of the hall, resulting in a small image size and poor visibility for students in the back rows.
Solution: The university installed a high-brightness laser projector with a long throw lens, capable of producing a large, clear image from the back of the lecture hall. They also replaced the old screen with a high-gain, matte white screen to enhance image brightness and uniformity. The AV team used projector calibration software to ensure optimal color accuracy and contrast. As a result, the new setup provided a significantly larger image size and improved visibility for all students, even those in the back rows.
- Outdoor Movie Night: A community organization wanted to host an outdoor movie night in a local park but struggled with finding a suitable projection setup that could provide a large, bright image from a considerable distance.
Solution: The organization rented a high-powered laser projector with a long throw lens and paired it with a large, inflatable outdoor screen. They used AV system integration software to control the projector settings and adjust the image geometry to compensate for the slight curvature of the inflatable screen. To ensure optimal visibility, they positioned the screen away from ambient light sources and used a high-gain surface to boost image brightness and contrast. The resulting setup successfully delivered a large, clear, and engaging image that could be enjoyed by a large audience from a safe distance.
- Art Gallery Installation: An art gallery wanted to create an immersive video installation that would project large, high-quality images onto the walls of the gallery. However, the limited space within the gallery made it challenging to position the projectors at the desired distance.
Solution: The gallery's AV team used a combination of short throw lenses and projector stacking to achieve the desired image size and quality within the limited space. They installed multiple high-resolution projectors with short throw lenses, positioned at strategic locations throughout the gallery. The team then used edge blending software to seamlessly merge the images from the multiple projectors, creating a single, large, and continuous projection. The result was a stunning and immersive video installation that transformed the gallery space and captivated visitors.
These case studies demonstrate the practical application of the techniques and strategies discussed throughout this blog post. By combining the right equipment, software, and expertise, AV professionals can overcome the challenges of increasing projector throw distance while maintaining exceptional image quality in a variety of settings.
Conclusion
In conclusion, increasing projector throw distance without sacrificing image quality is a complex task that requires careful consideration of various factors, including projector specifications, lens options, room layout, and ambient light control. By understanding the principles of throw ratio and proper projector placement, you can effectively extend the throw distance and achieve a larger image size without compromising on quality.
The key takeaways from this comprehensive guide include:
- Selecting the appropriate lens for your projector and desired throw distance is crucial. Long throw lenses, short throw lenses, and zoom lenses each have their advantages and can be used to increase throw distance in different scenarios.
- Advanced techniques such as projector stacking, edge blending, warping, and geometry correction can help you further extend the throw distance and create seamless, high-quality images in challenging environments.
- AV system integration software and regular projector calibration are essential tools for optimizing your setup, streamlining the installation process, and maintaining optimal image quality over time.
- Adapting your projector placement and setup to the specific requirements of your environment, whether it be a home theater, classroom, large venue, or outdoor space, is critical for achieving the best possible results.
Remember, the key to success lies in continuous learning, experimentation, and adaptation. As technology advances and new solutions emerge, stay informed and open to exploring innovative ways to optimize your projector setup. By doing so, you'll be well-equipped to overcome any throw distance challenge and deliver outstanding image quality in any setting.